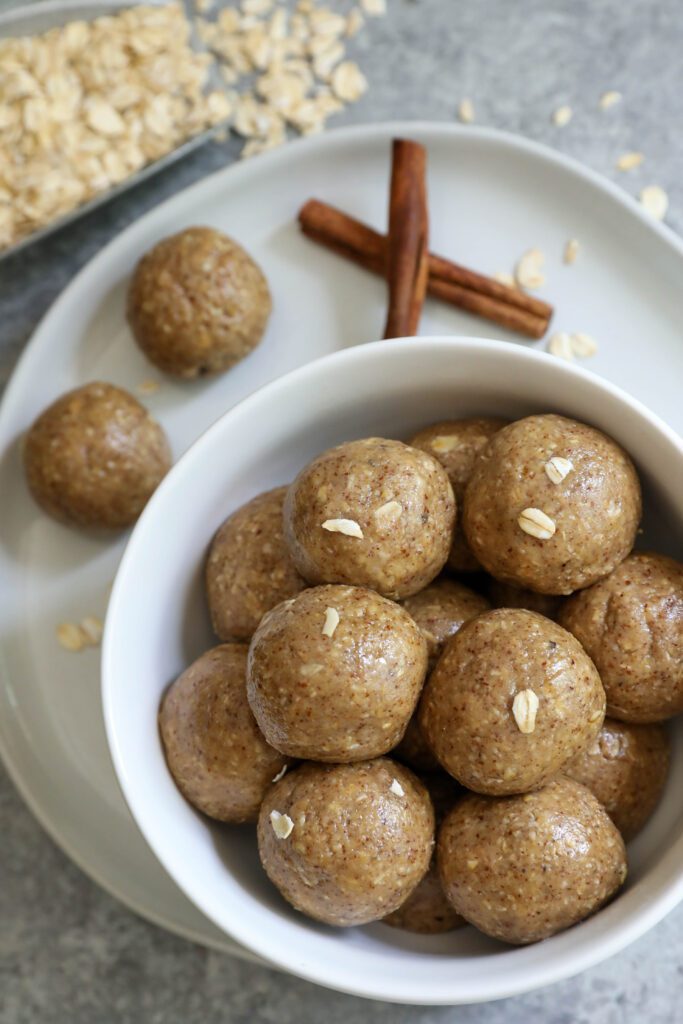
Snickerdoodle Oat Bliss Balls that taste like a snickerdoodle in energy ball form. They’re made with oats, protein powder, nut butter, and lots of cinnamon!
I’m the queen of portable snacks.
And I’m the best traveling companion because not only do I have a bar for you, but one for you, too, boo.
Usually I have a pre-packaged snack bar in every purse pocket, but I’m trying to do better about making some of my own snacks.
Making your own energy balls is great because you can control the ingredients while using less packaging!
These Snickerdoodle Oat Bliss Balls make it easy to love making your own energy balls.
They’re made with 6 ingredients that you probably already have in your pantry.
Mix some up this week for a sweet no-bake treat to power all of your summer activities!
Snickerdoodles Meets Bliss Balls
All you need to know is that these cookies taste like sweet Snickerdoodle meets chewy oatmeal cookie in energy ball form.
They’re perfectly sweet, chewy, and packed with plant-based protein.
And they’re super portable, so you can stash at home or enjoy them on to go.

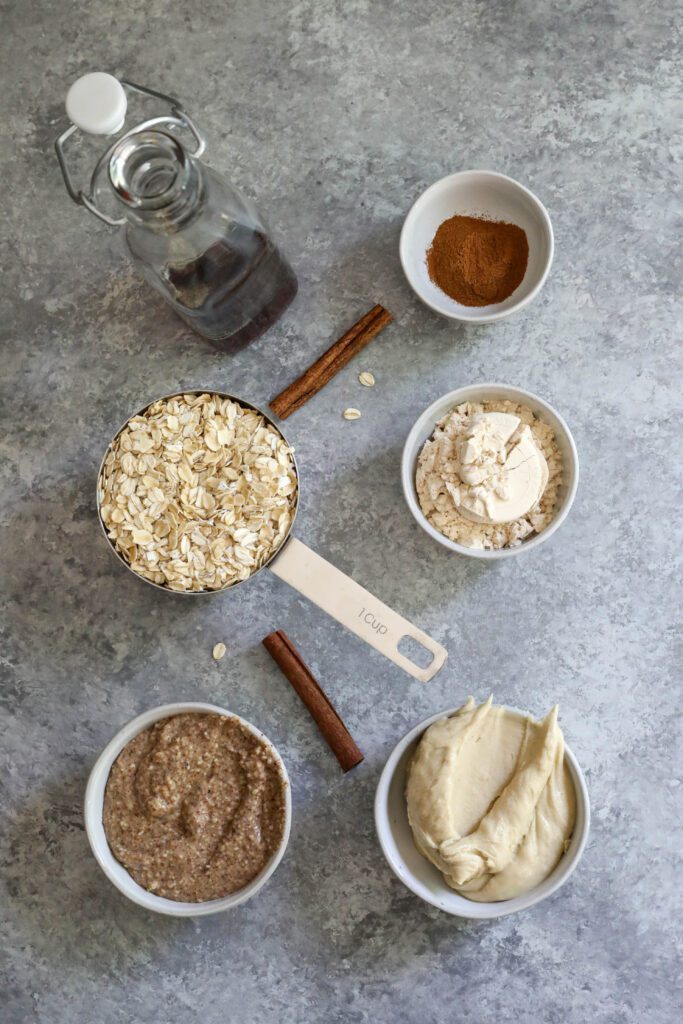
What You Need to Make Snickerdoodle Oat Bliss Balls
Here’s what you need:
- gluten-free old-fashioned rolled oats
- vanilla protein powder
- Artisana Almond Butter
- Artisana Cashew Butter
- pure maple syrup
- ground cinnamon
That’s it!

How to Make Snickerdoodle Oat Bliss Balls
First, line a baking sheet or a plate with parchment paper.
This will prevent any sticking later and makes for a super easy clean up.

Add the oats to a high-speed blender or food processor and pulse until they’re slightly broken down but not completely a flour.
If you prefer less textured balls, blend the oats to a flour for a smoother consistency.
Now you can add all of the remaining ingredients and continue to pulse until you have a thick well-combined dough.
I used vanilla protein powder to add even more plant-based protein to this recipe.
If you’re not into protein powder or don’t have one on hand, try subbing more oats here, instead.

What Nut Butters I Used
The dough should stick together when pressed with your hands.
If the dough is too dry, add a bit more nut butter or maple syrup.
I love the combination of almond and cashew butter, but you can sub any neutral nut or seed butter in their place.
I highly recommend using a 1:1 ratio of Artisana Almond Butter and Artisana Cashew Butter.
These organic raw 1-ingredient nut butters are absolutely delicious!
For even more texture, try adding a tablespoons of chia, flax, or hemp seeds.
Alternatively, if it’s too wet, you can add a bit more oatmeal to thicken things up.

Using a cookie scoop, scoop the dough out of the blender and and roll it into balls with your hands.
Place the balls on your prepared parchment lined baking sheet or plate.
Repeat this until all of the dough in the blender is gone.
The dough should make about 16-24 balls, depending on the size of your cookie scoop.

Notes on Meal Prep
You can enjoy the balls immediately, but they have better texture and flavor after they chill for a bit!
I like to transfer the baking sheet or plate to the refrigerator for ~30 minutes to firm up.
After the 30 minutes are up, you can enjoy them anytime for a quick snack!
Transfer the Snickerdoodle Oat Bliss Balls to an airtight container and store them in the refrigerator for up to two weeks.

How to Serve Snickerdoodle Oat Bliss Balls
Enjoy these Snickerdoodle Oat Bliss Balls as a sweet and satisfying snack.
They’re totally plant-based, gluten-free, and naturally sweetened with maple syrup.
I like to prepare mine on Sunday for an easy meal prep recipe to enjoy all week long.
They’re bite-sized but don’t let their cute size fool you!
Each bliss ball is packed with plant-based protein, fiber, and healthy fats.
These balls are perfect to enjoy for pre/post workout fuel, a sweet snack, or a healthier dessert.
Enjoy!

More Bliss Ball Recipes
-
SunButter & Jelly Bliss Balls
-
Blueberry Muffin Energy Balls
-
Grain-Free Chocolate Cherry Bliss Balls
-
Pumpkin Apple Bliss Balls
-
SunButter Date Bliss Balls
-
Lemon Chia Bliss Balls
-
Carrot Cake Bliss Balls
-
Gingerbread Bliss Balls
-
Pumpkin SunButter Chocolate Chip Bliss Balls
-
Beet Brownie Bliss Balls
-
Maple Walnut Bliss Balls
-
Raspberry Cashew Cheesecake Bliss Balls
I Want to Hear From You
If you try these Snickerdoodle Oat Bliss Balls, let me know!
Be sure to leave me a comment, rating, and review so I can use your feedback to create more yums.
Give me a shout on Instagram and use #floraandvino to show me your creations.
Check out my Pinterest page to pin more recipes like this one to make later.
Love this post and want more? Go to my homepage and subscribe to get updates delivered right to your inbox!
XO Lauren


Snickerdoodle Oat Bliss Balls
- Total Time: 15 minutes
- Yield: 12-16 balls
- Diet: Vegan
Description
Snickerdoodle Oat Bliss Balls that taste like a snickerdoodle in energy ball form. They’re made with oats, protein powder, nut butter, and lots of cinnamon!
Ingredients
- 1 ½ cups gluten-free old-fashioned rolled oats
- 1 scoop vanilla protein powder (~1/3 cup)
- ½ cup Artisana Almond Butter
- ½ cup Artisana Cashew Butter
- ½ cup pure maple syrup
- 1 tsp ground cinnamon
Instructions
- Line a baking sheet or plate with parchment paper.
- Add the oats to a high-speed blender or food processor and pulse until the oats are slightly broken down but not completely a flour.
- Add all of the remaining ingredients and continue to pulse until you have a thick well-combined dough. The dough should stick together when pressed with your hands.
- Using a cookie scoop, scoop the dough out of the blender and and roll it into balls with your hands. Place the balls on the parchment lined baking sheet or plate. Repeat this until all of the dough in the blender is gone.
- Transfer the baking sheet or plate to the refrigerator for ~30 minutes to firm up. Enjoy as a quick snack! The balls will keep in the refrigerator for up to two weeks and can be frozen for long term storage.
Notes
Recipe adapted from Tone It Up and All The Healthy Things
- Prep Time: 15 mins
- Cook Time: 0 mins
- Category: Snack, Meal Prep
- Method: Hand-mix
- Cuisine: Vegan, Gluten-Free, Refined-Sugar-Free

Very easy and good! I’m going to be using these as snacks for my son. He’s going to love them.
Hey Christy, I’m so glad that you enjoyed these! I hope your son enjoyed them!
XOXO Lauren