Easy raw vegan cheesecake bites with soaked cashews and coconut milk coated in dark chocolate. The perfect naturally sweetened pre-portioned treat.
My life is currently split between two homes, each marked by bulging brown boxes.
I’m still primarily living from the condo, because that’s where the food and bed is, ya know.
But more and more I’m starting to feel out my new townhome.
Last Saturday I sat on the carpeted stairs, eating a raw bar and listening to the air conditioner, trying to imagine my whole life and business expanding within the angular white walls.
Each time a friend comes over to see the new digs it feels a little more like home.
The goal is to have everything out by early next week, and by everything I mean everything, from my favorite recliner down to the last Hu Kitchen gem.
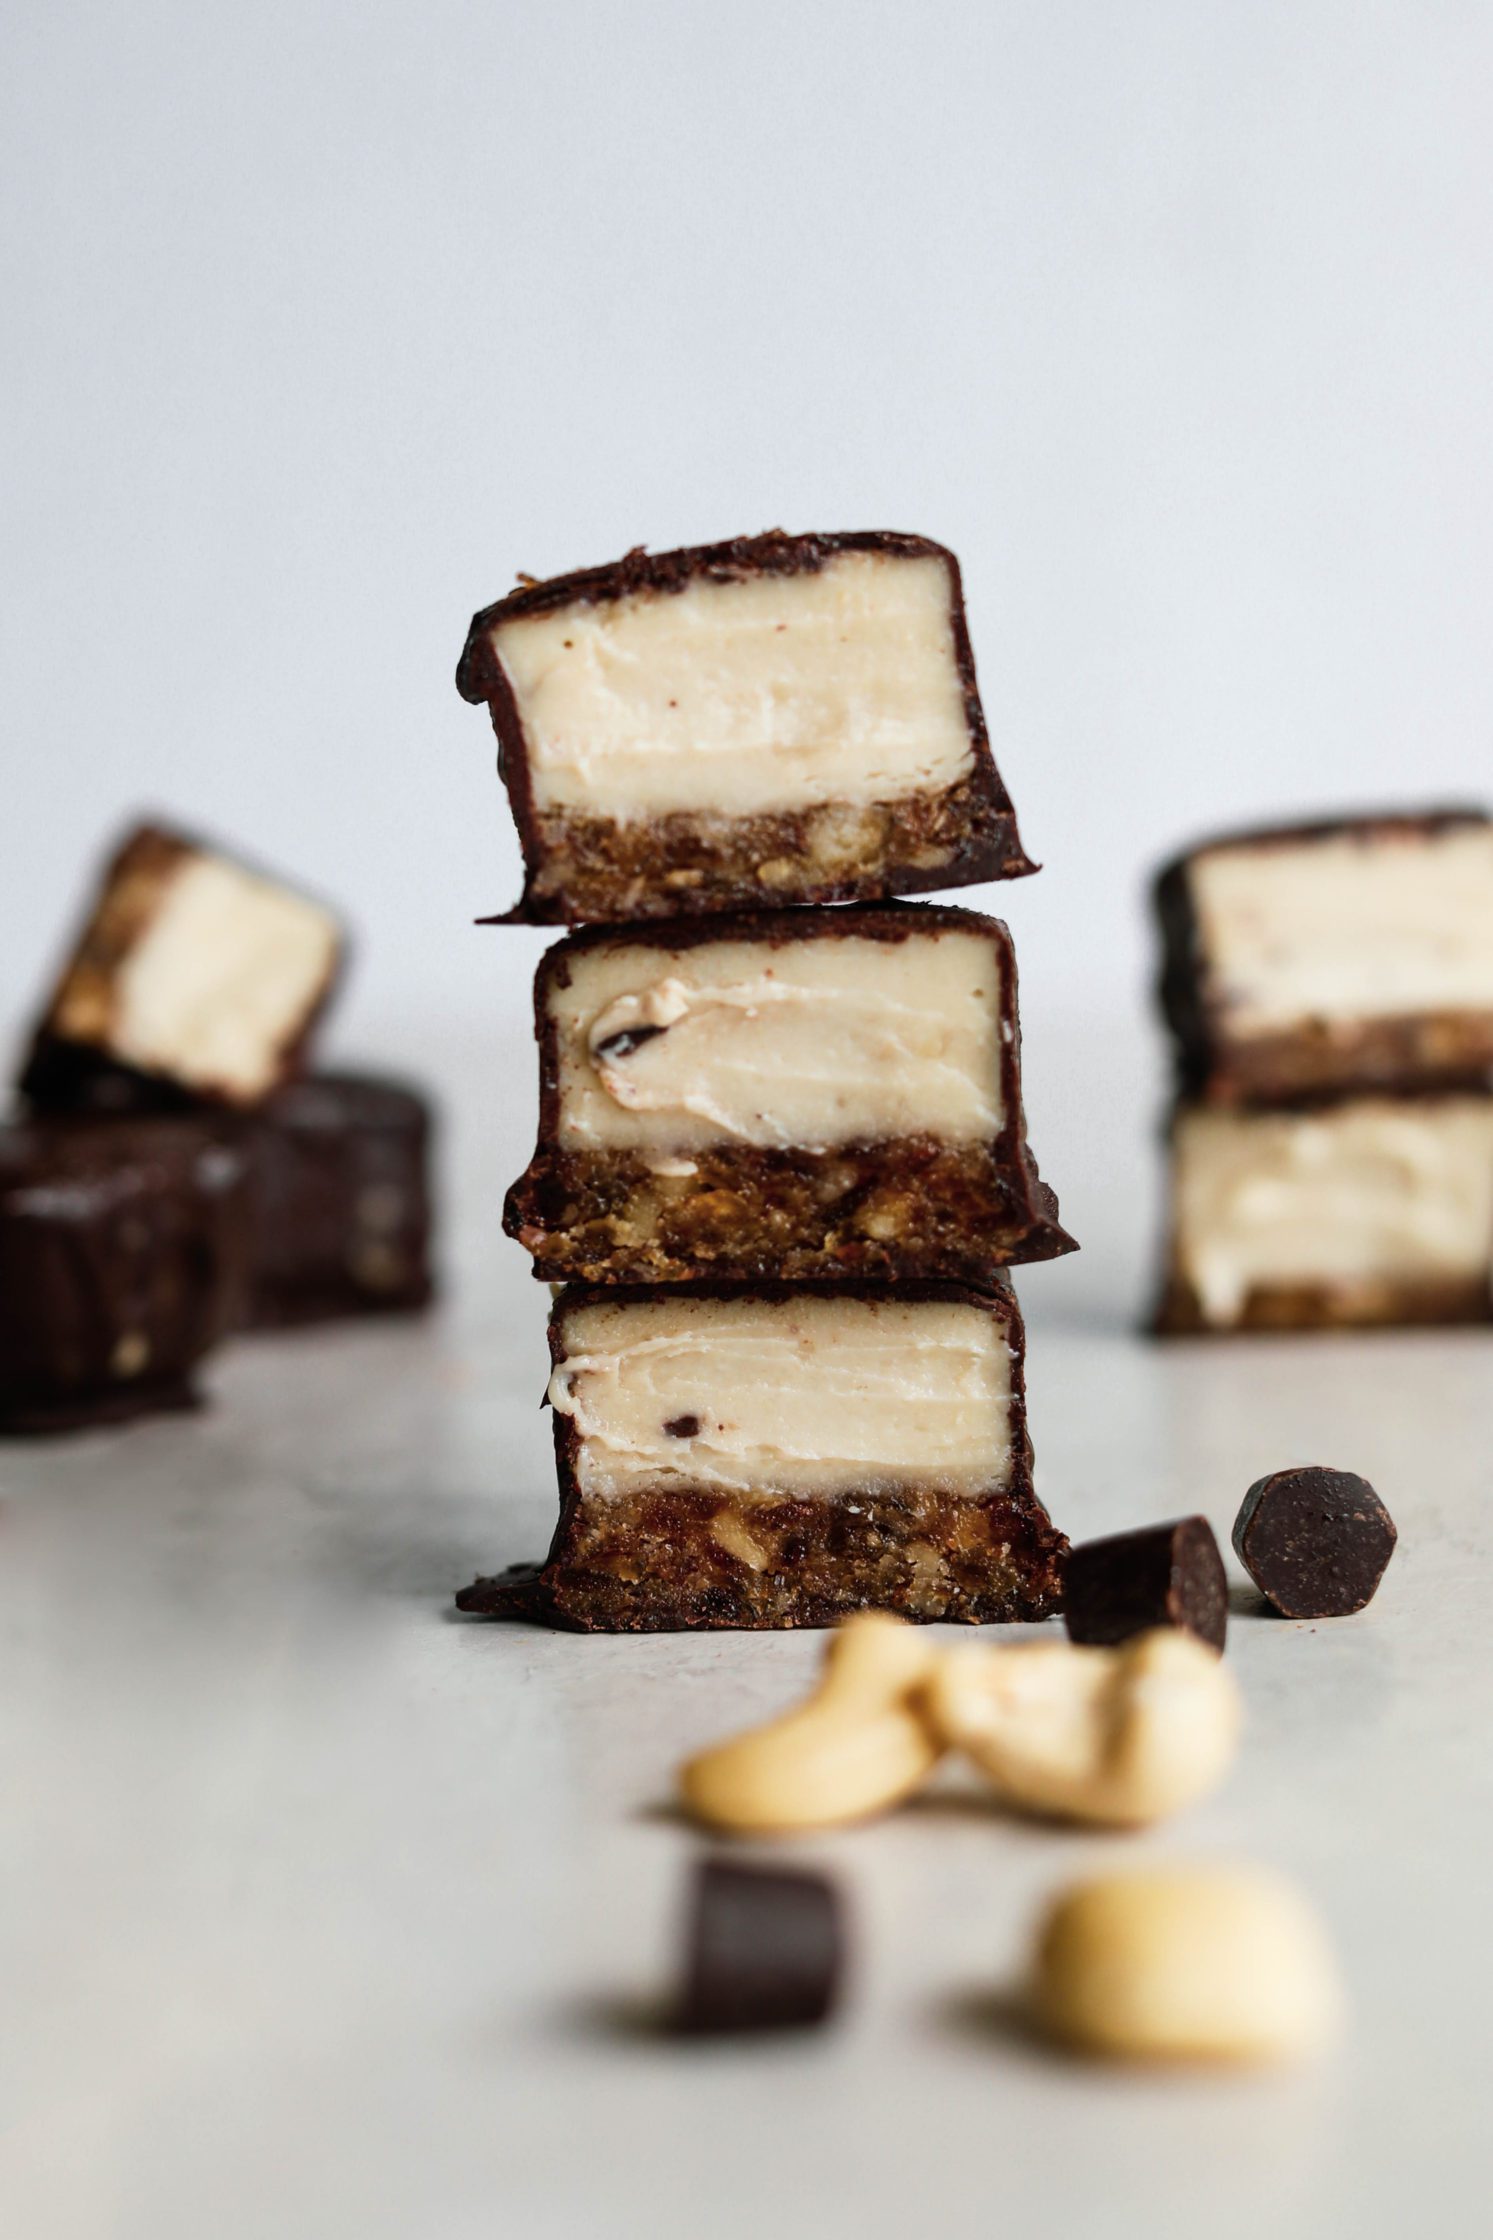
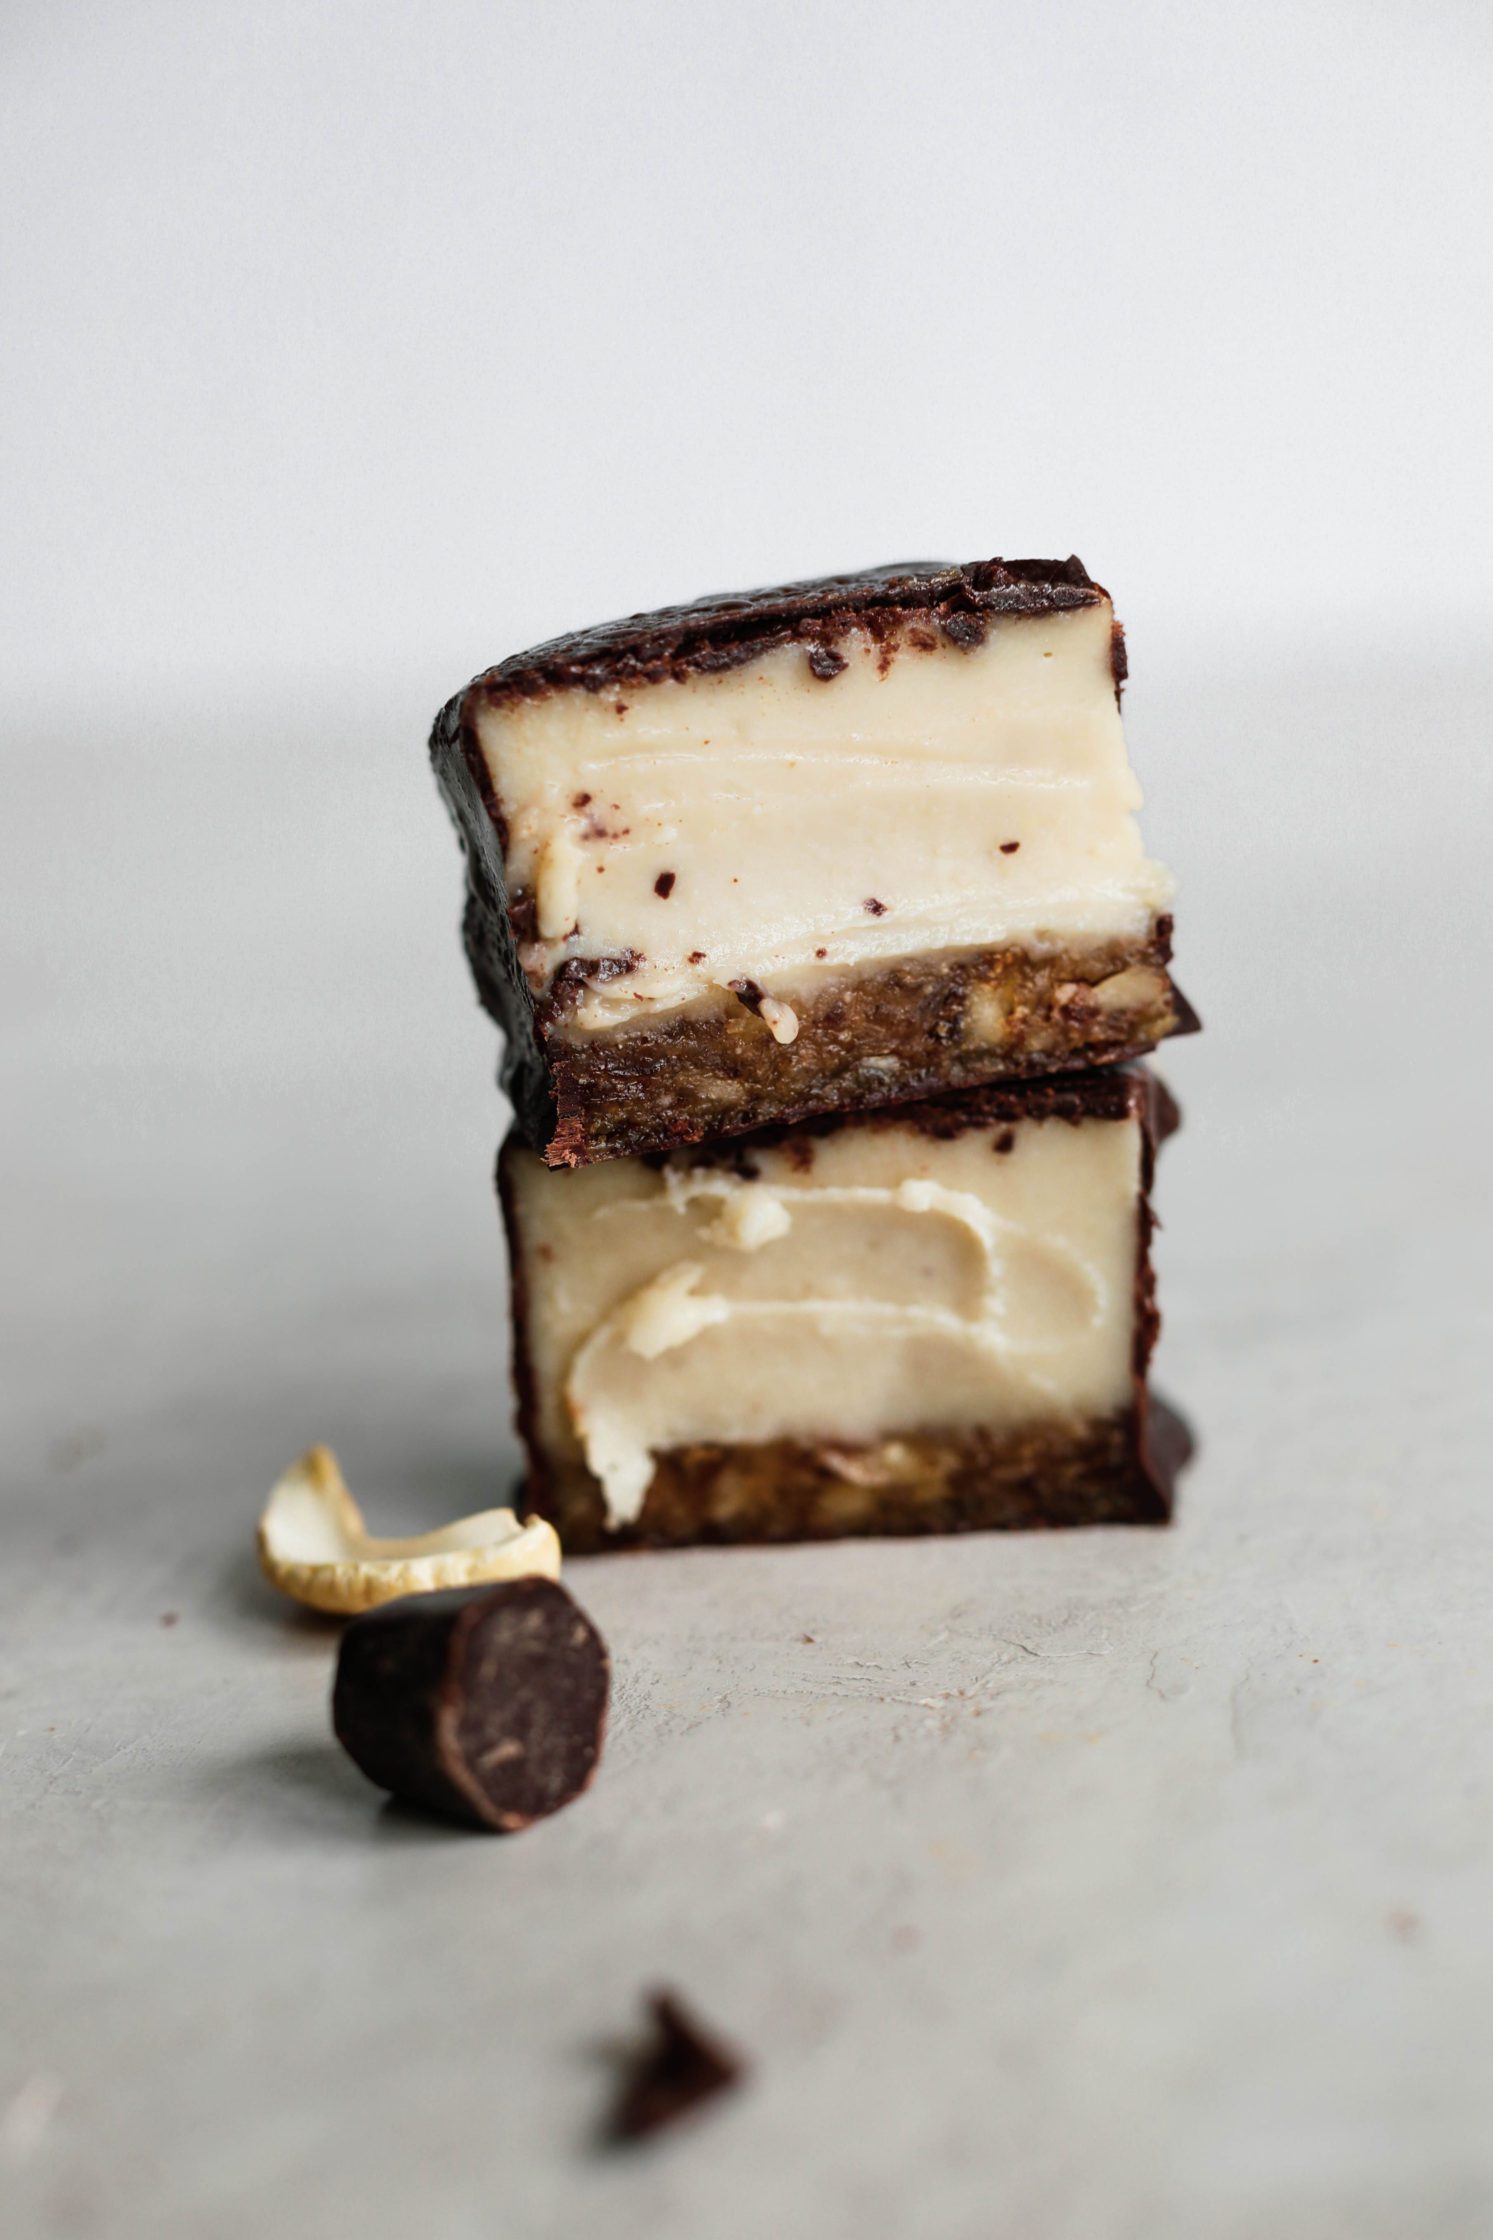
So I’m currently accepting moving assistance for Chocolate Dipped Cashew Cheesecake Bites.
We should probably eat them up now, right, in case they don’t survive the move from current to future fridge?
Yes, yes, we should.
Show me your muscles and I’ll show you a raw vegan no-bake dessert with just 8 ingredients!
I keep trying to view this move as a chance to really tap into my inner striving minimalist.
Moving from point A to B is decidedly easier with less, and forced change is always a great opportunity to take stock in what we actually *need*.
But we definitely need vegan cheesecake.
Luckily this vegan cheesecake does the whole minimalism thing pretty well with easy whole foods ingredients you probably already have on hand.
The only thing better than vegan cheesecake is vegan cheesecake encased in dark chocolate.
Swoon!
Let’s talk set up for a second because these simple things will make the rest of the recipe as easy as cake.
Because this recipe favors square shapes for the bites, I recommend using a square pan for your purposes here; it’ll just make everything easier.
Before we add the good stuff, line it with parchment paper to precent sticking.
Pro tip: It’s a little counter-intuitive as this is an oil-free recipe, BUT, if you grease the bottom of your pan before pressing the parchment paper in, it does an excellent job of keeping the paper in place!
OK, now that that’s out of the way we can start the cheesecake layers.
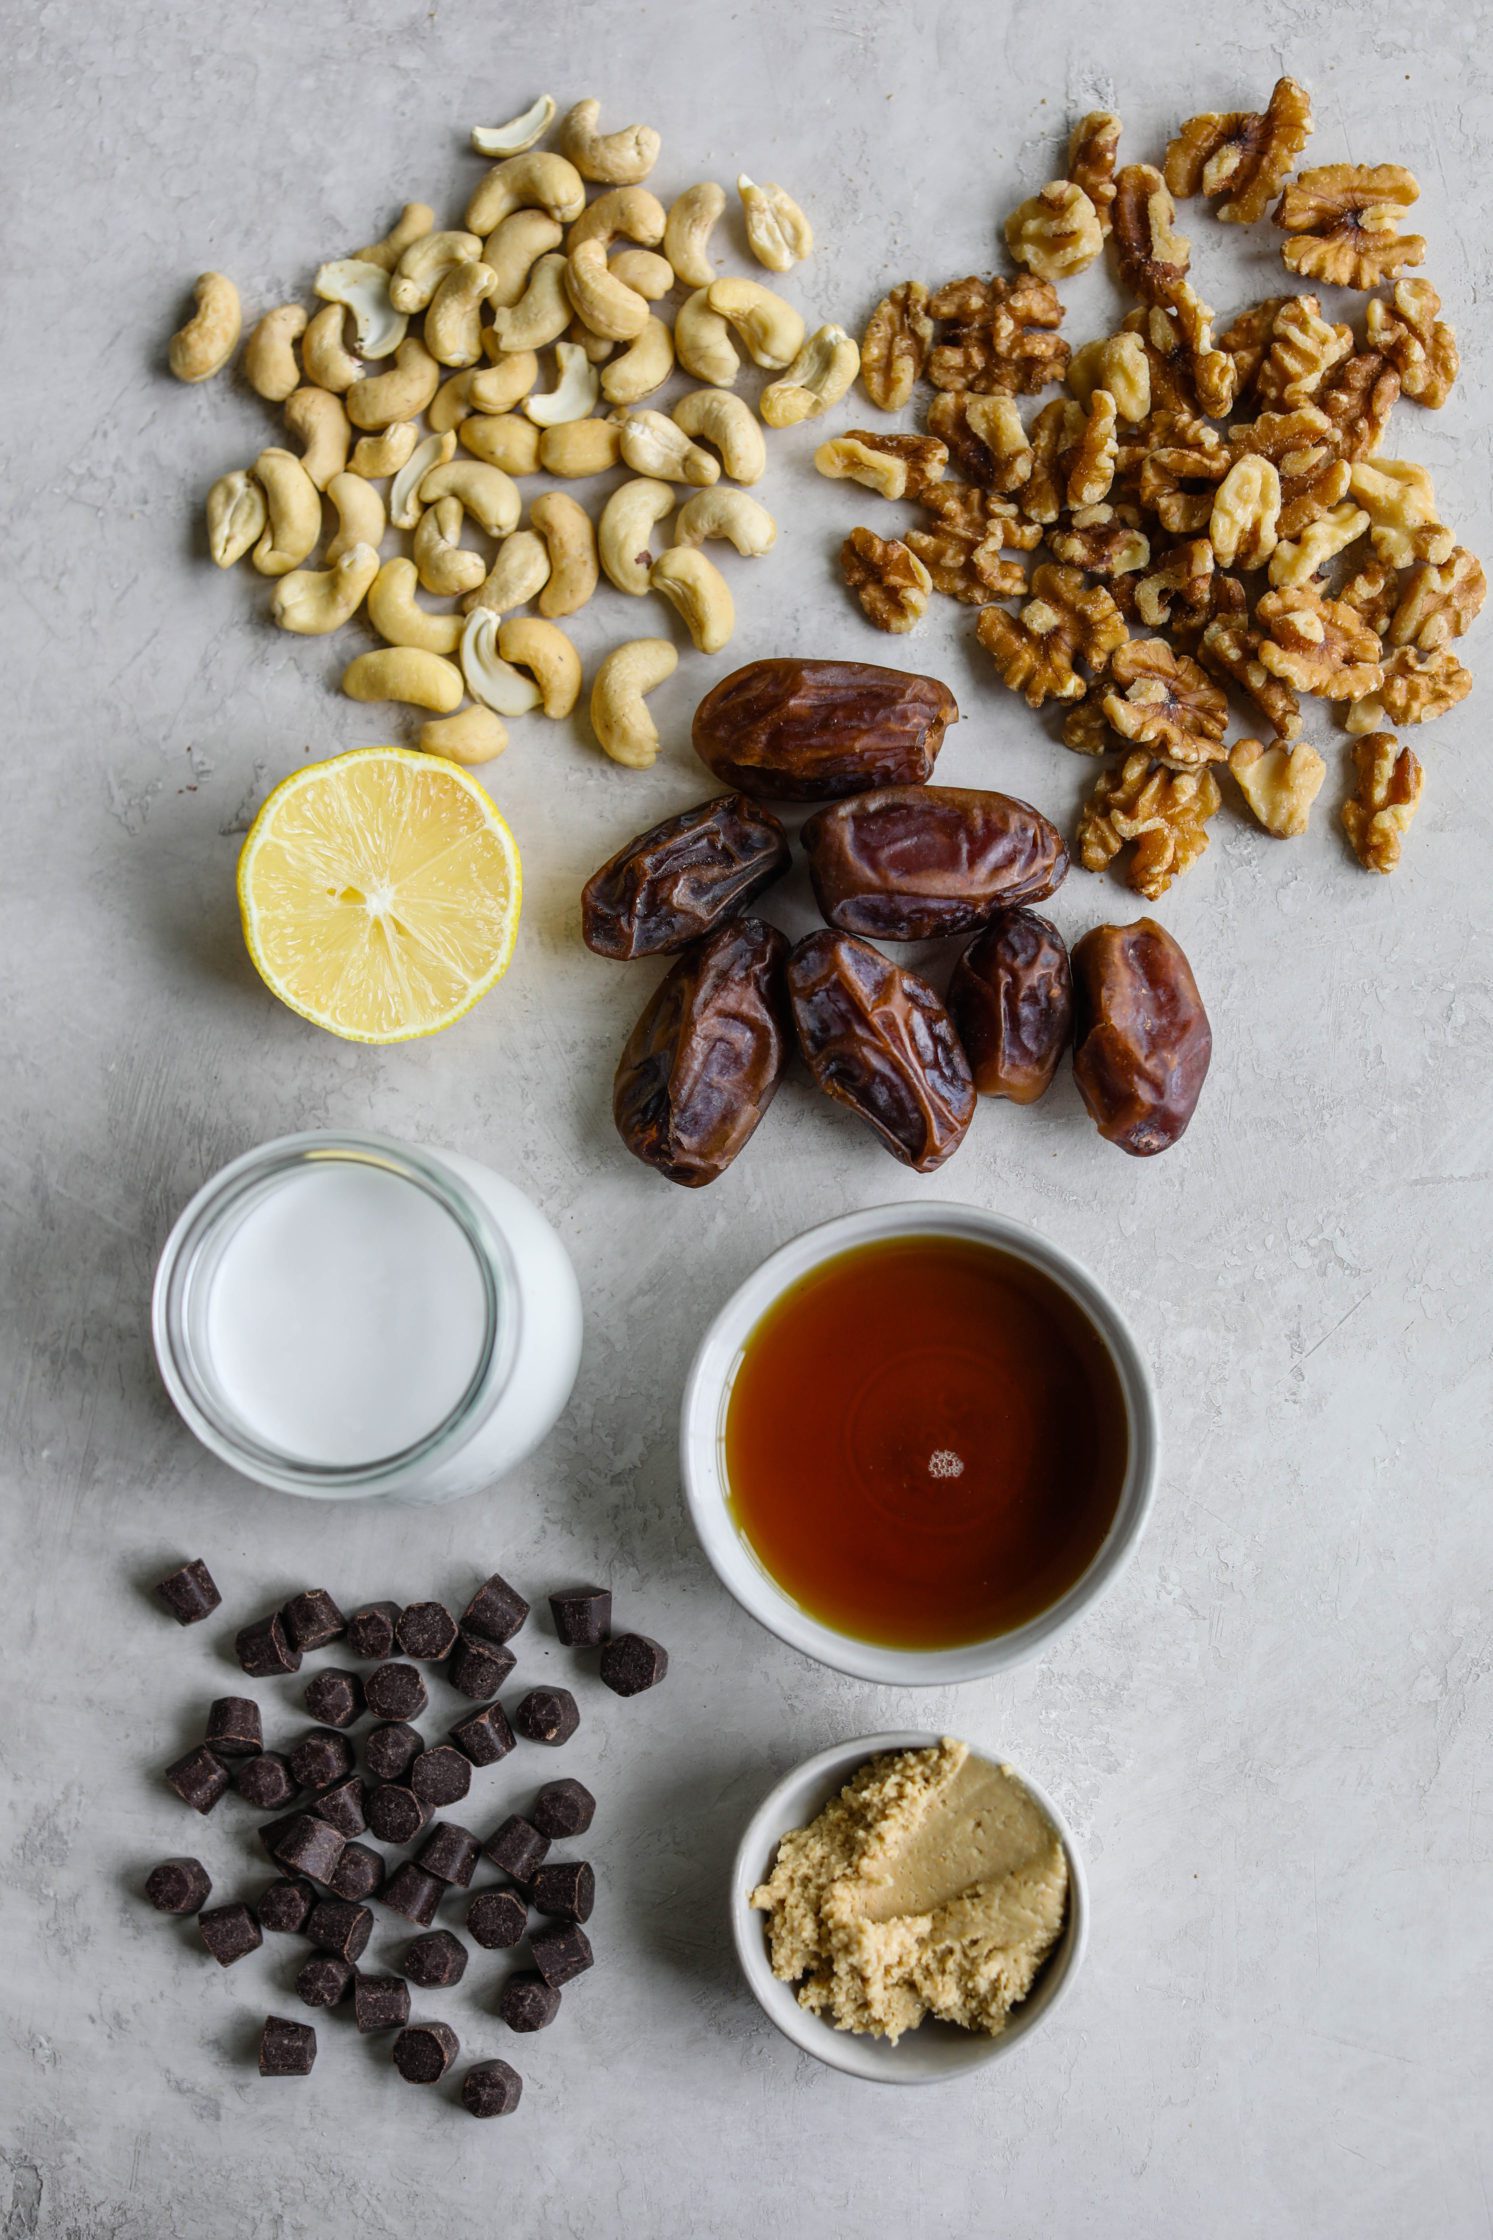
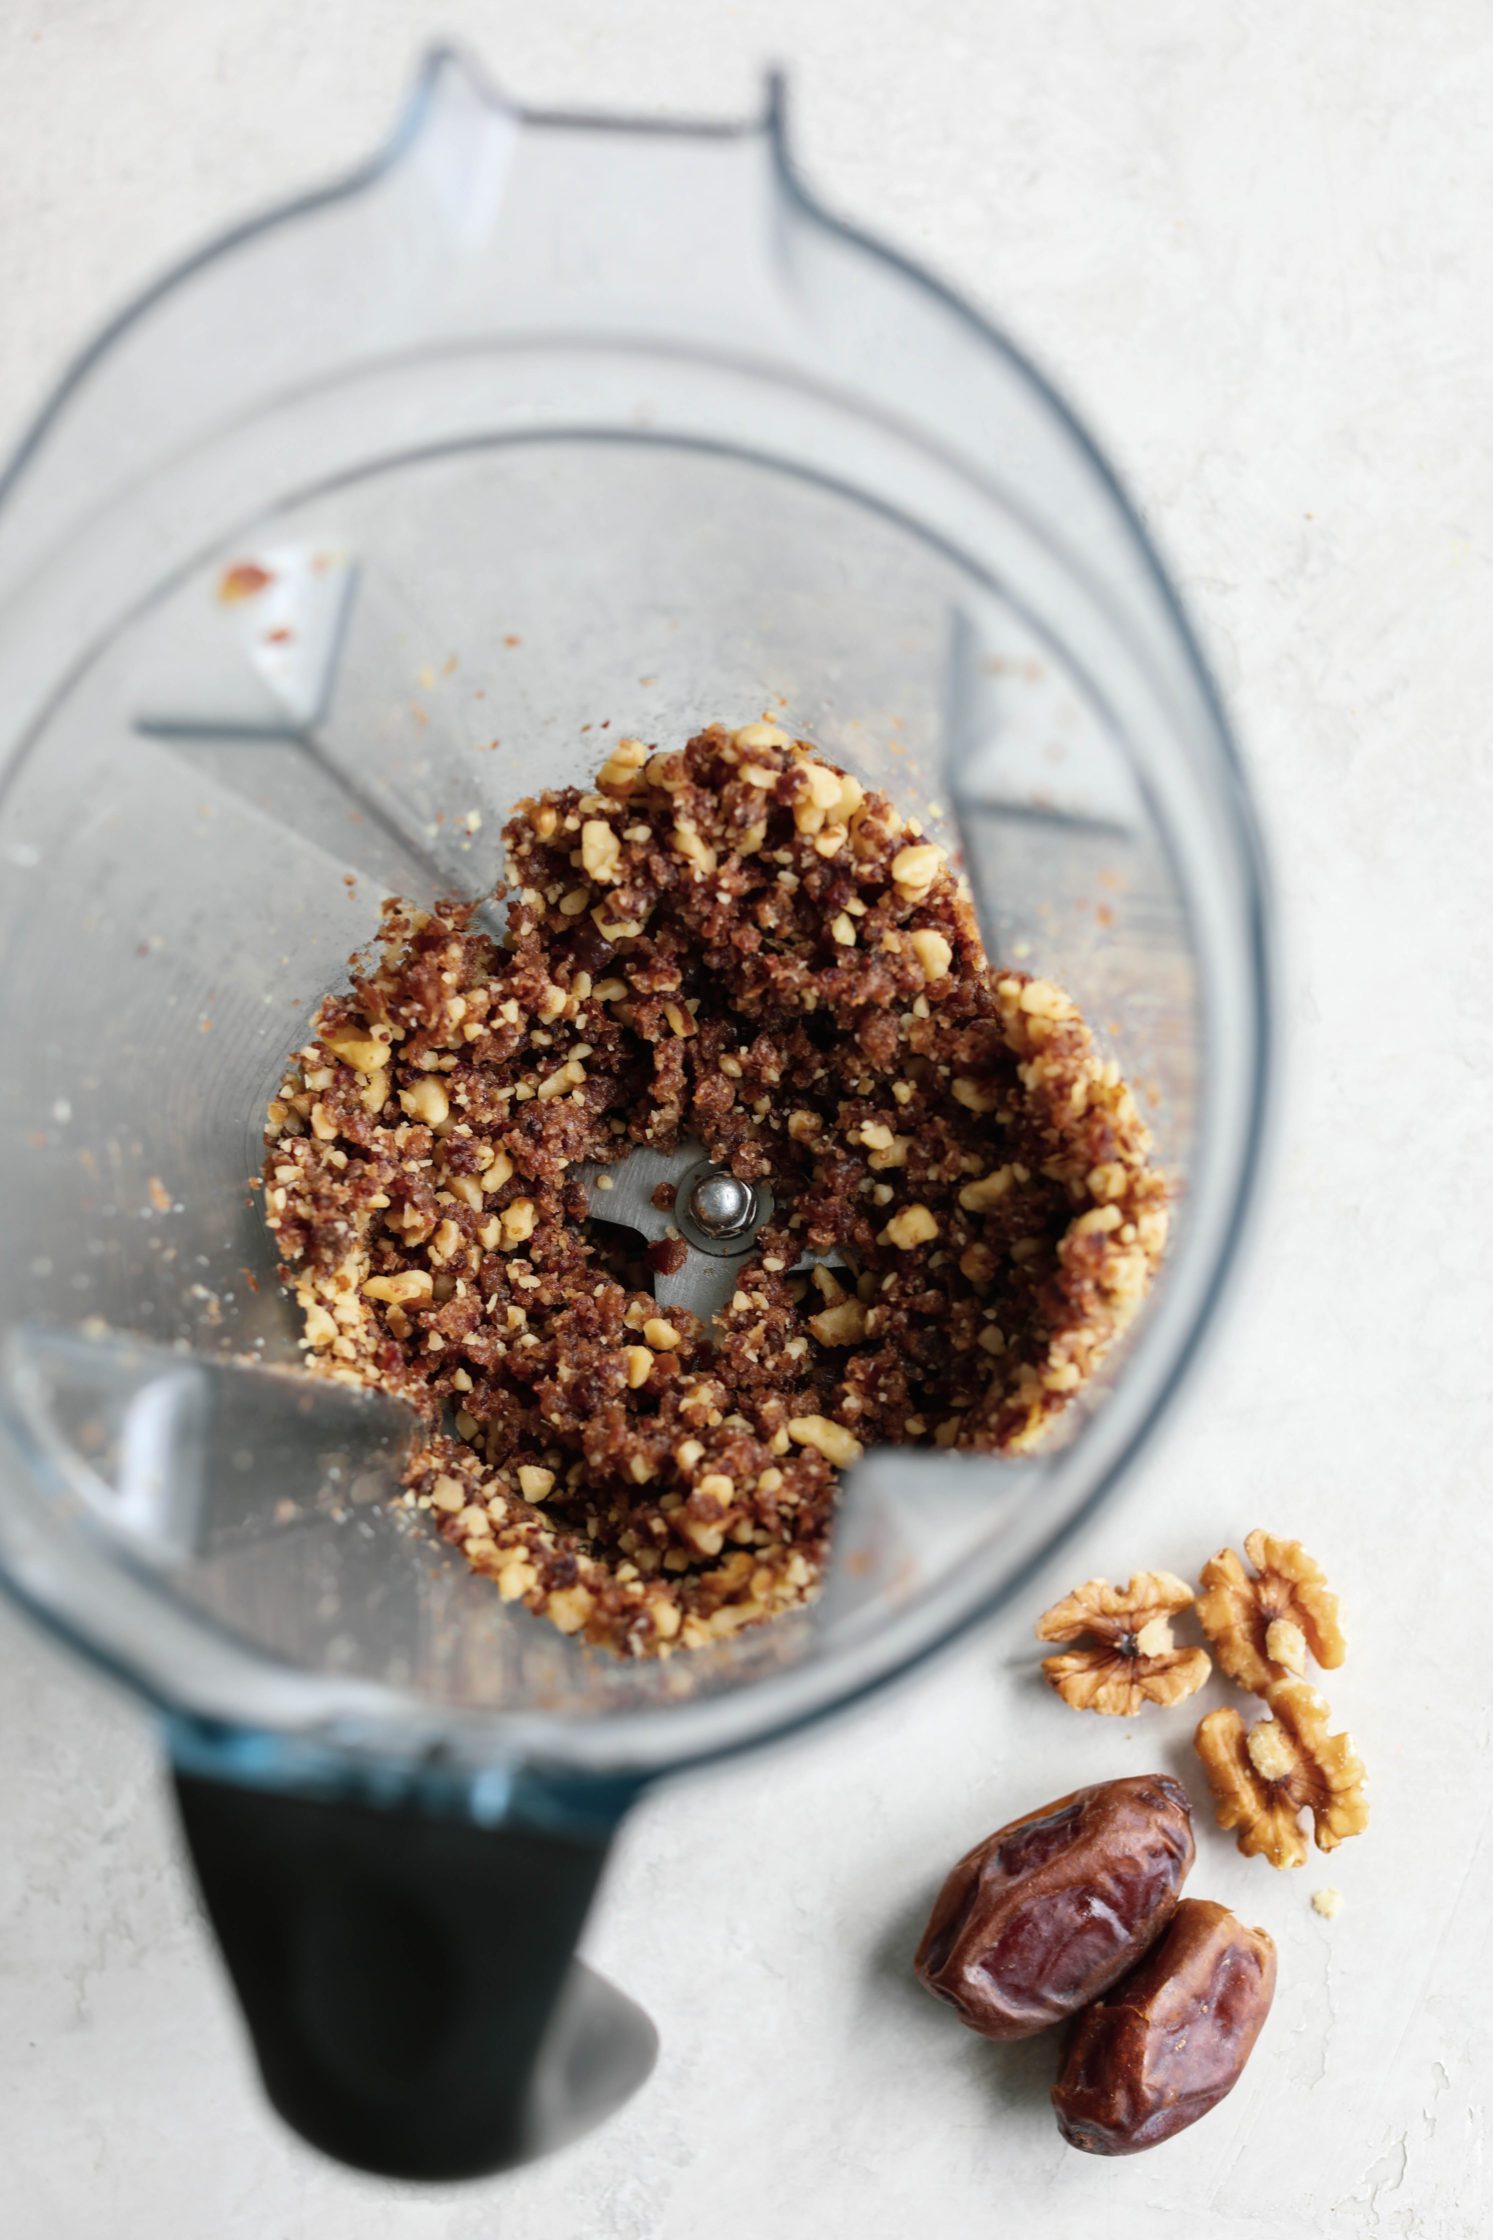
The crust is a simple 1:1 date:nut blend; a classic in raw vegan desserts.
I like the taste and texture of a date/walnut combination, but you can use virtually any nut instead.
Almonds work well here, too!
The mixture will form a sticky ball in your blender that you then press into the parchment lined pan to form an even base.
Pro tip: wet your hands slightly while pressing the mixture into the pan to prevent sticking.
It’s magic!
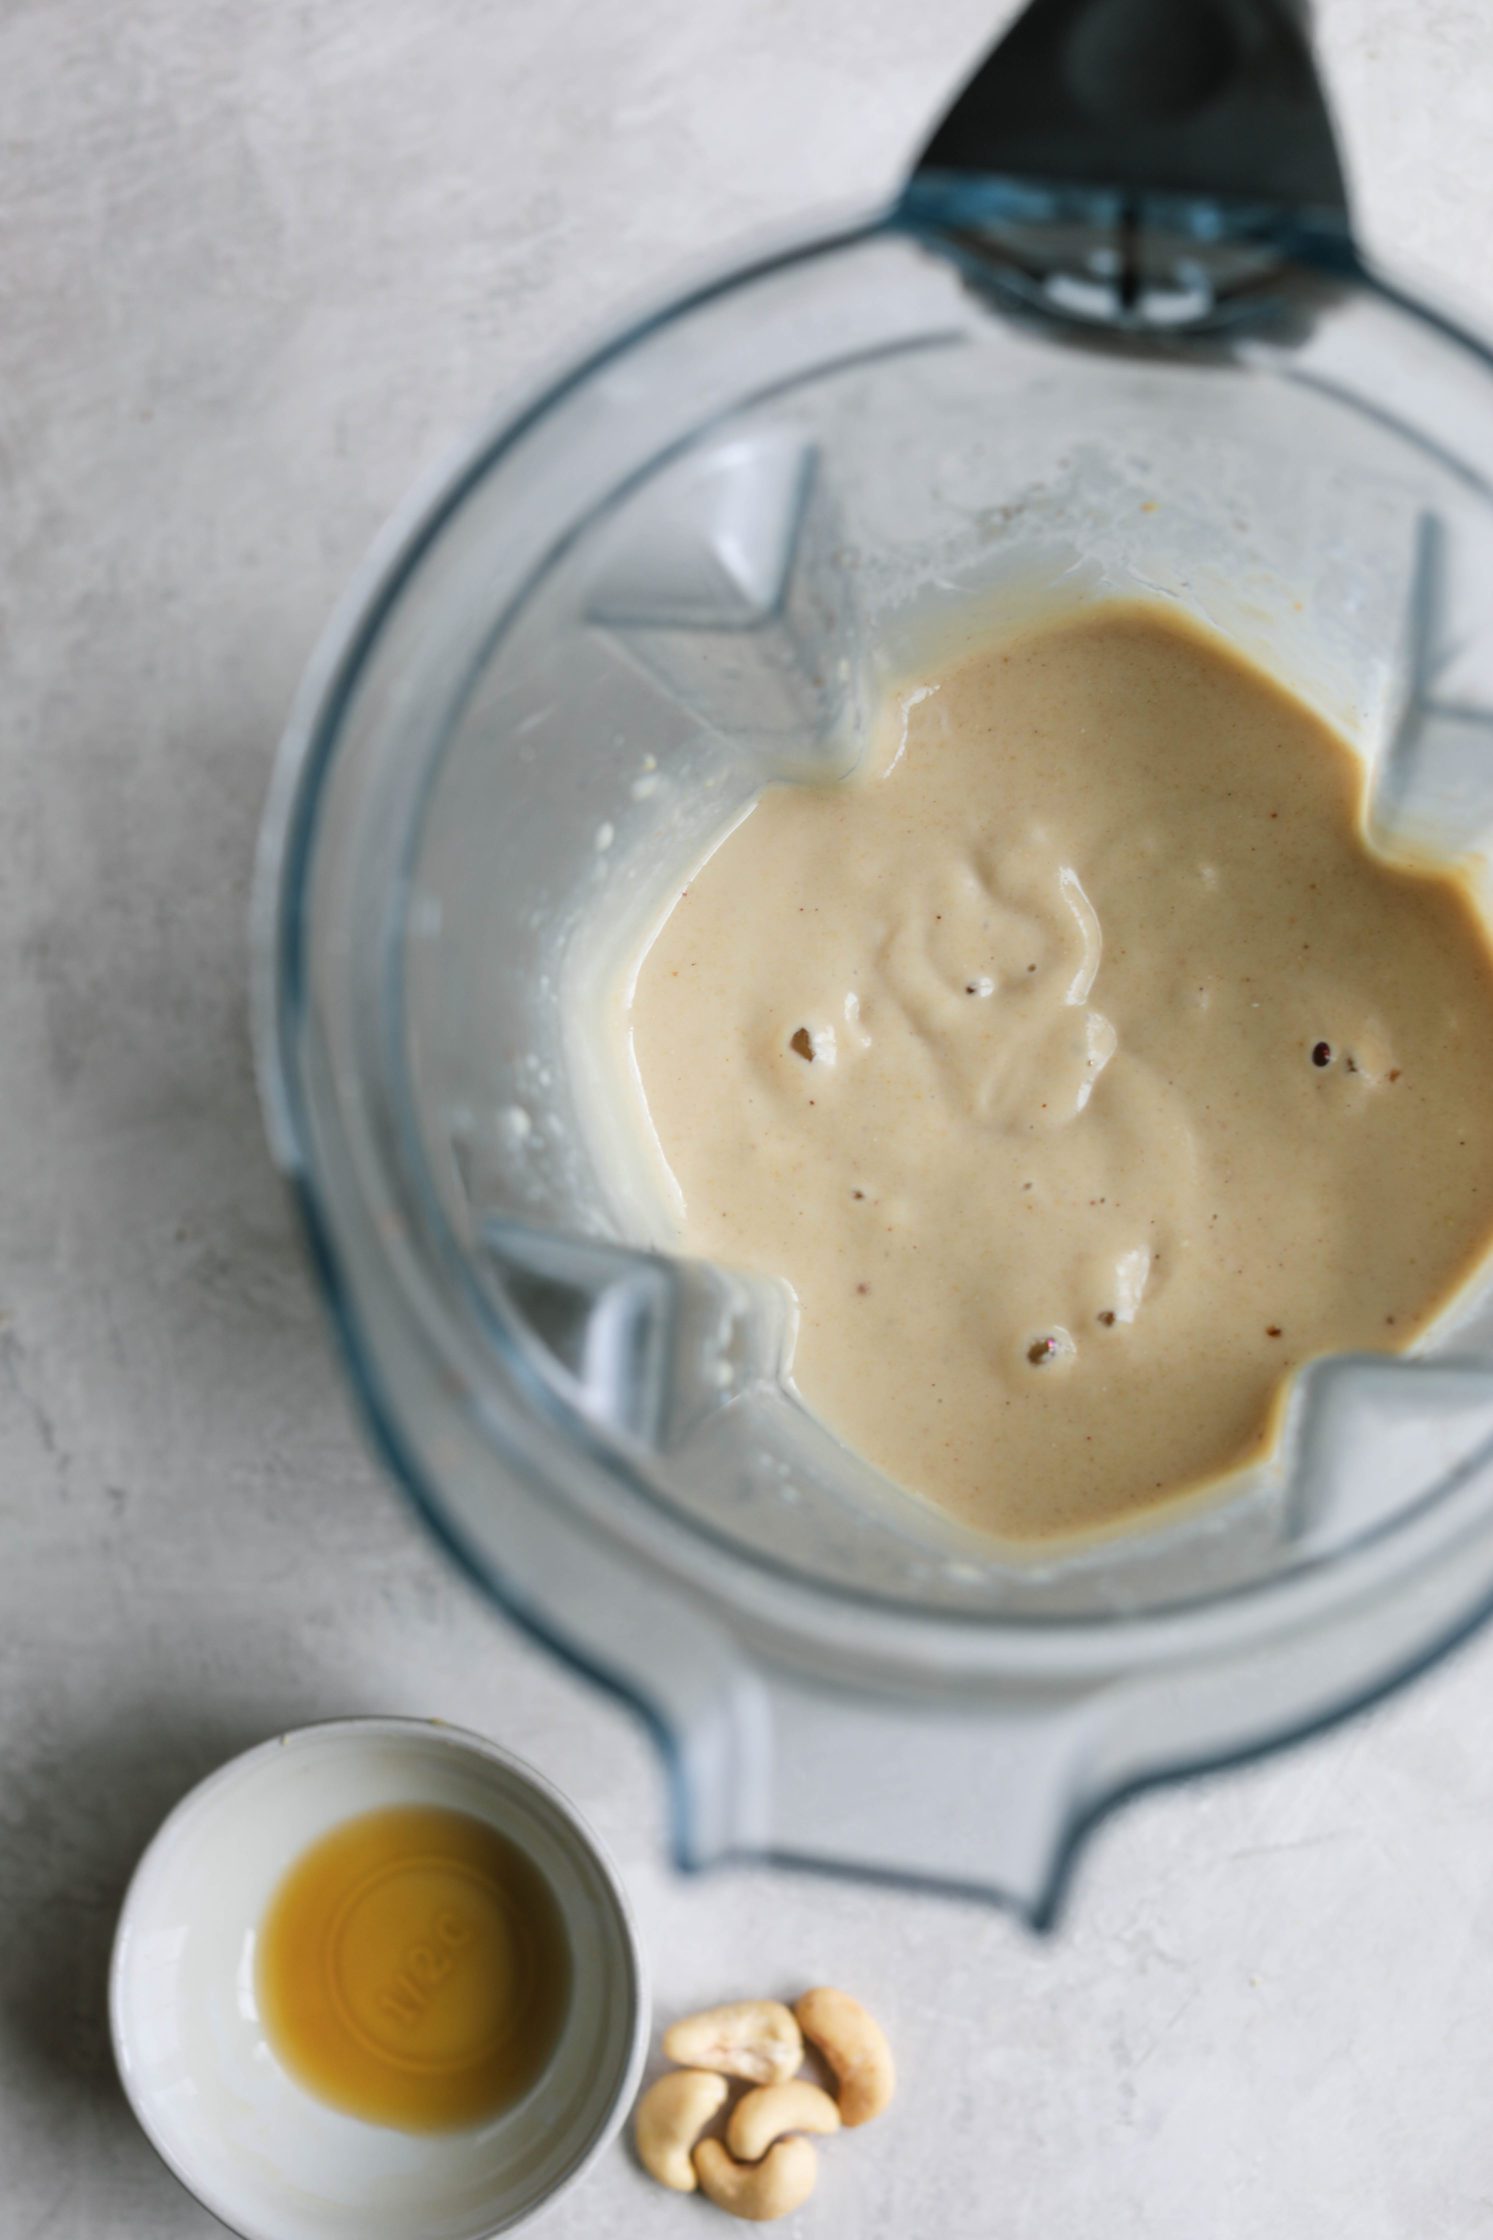
The filling is an easy blend of quick soaked cashews, creamy cashew butter, and full-fat coconut milk.
Lemon adds brightness and acidity and maple syrup adds smooth refined sugar-free sweetness!
If you’d prefer another sweetener, try substituting an equal measurement of date paste or 6-8 dates instead.
The filling should be set after 8 hours or so, but I recommend letting it chill overnight if you have the extra time.
You want the cheesecake layer to be good and solid before slicing into squares.
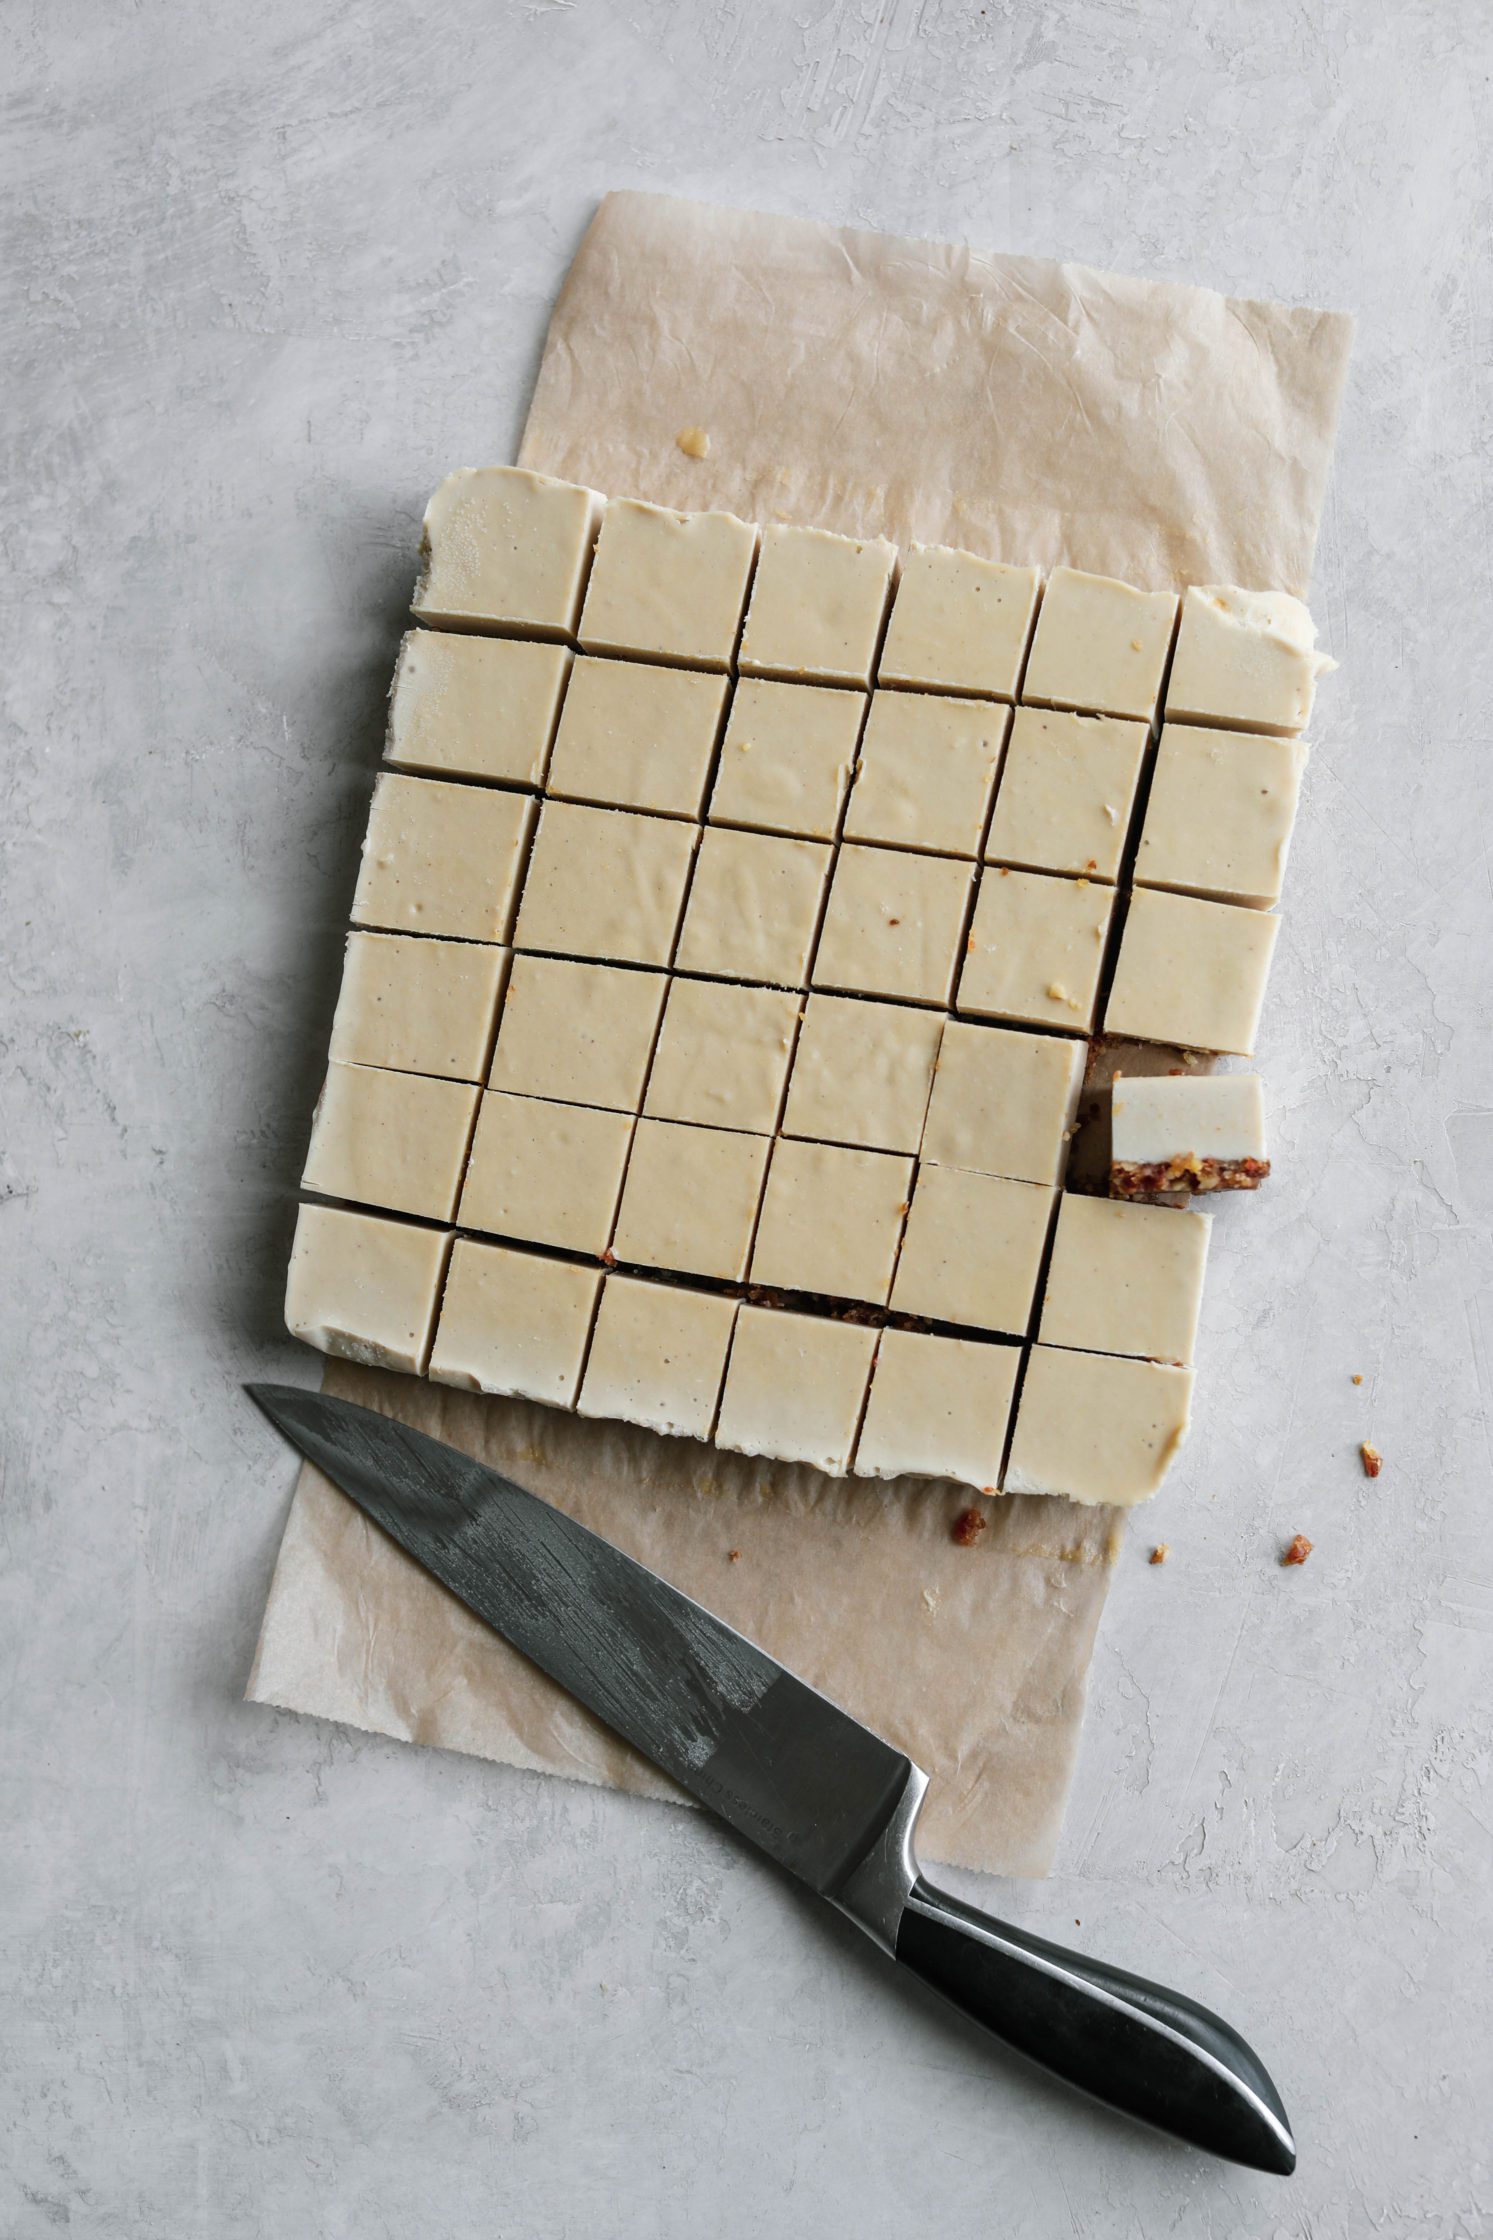
In the morning, or whenever your cheesecake is solid, transfer cake to a cutting board and slice into small even squares.
I found that 36 squares worked for my 9 x 9 pan-, but more or less is fine depending on your pan size.
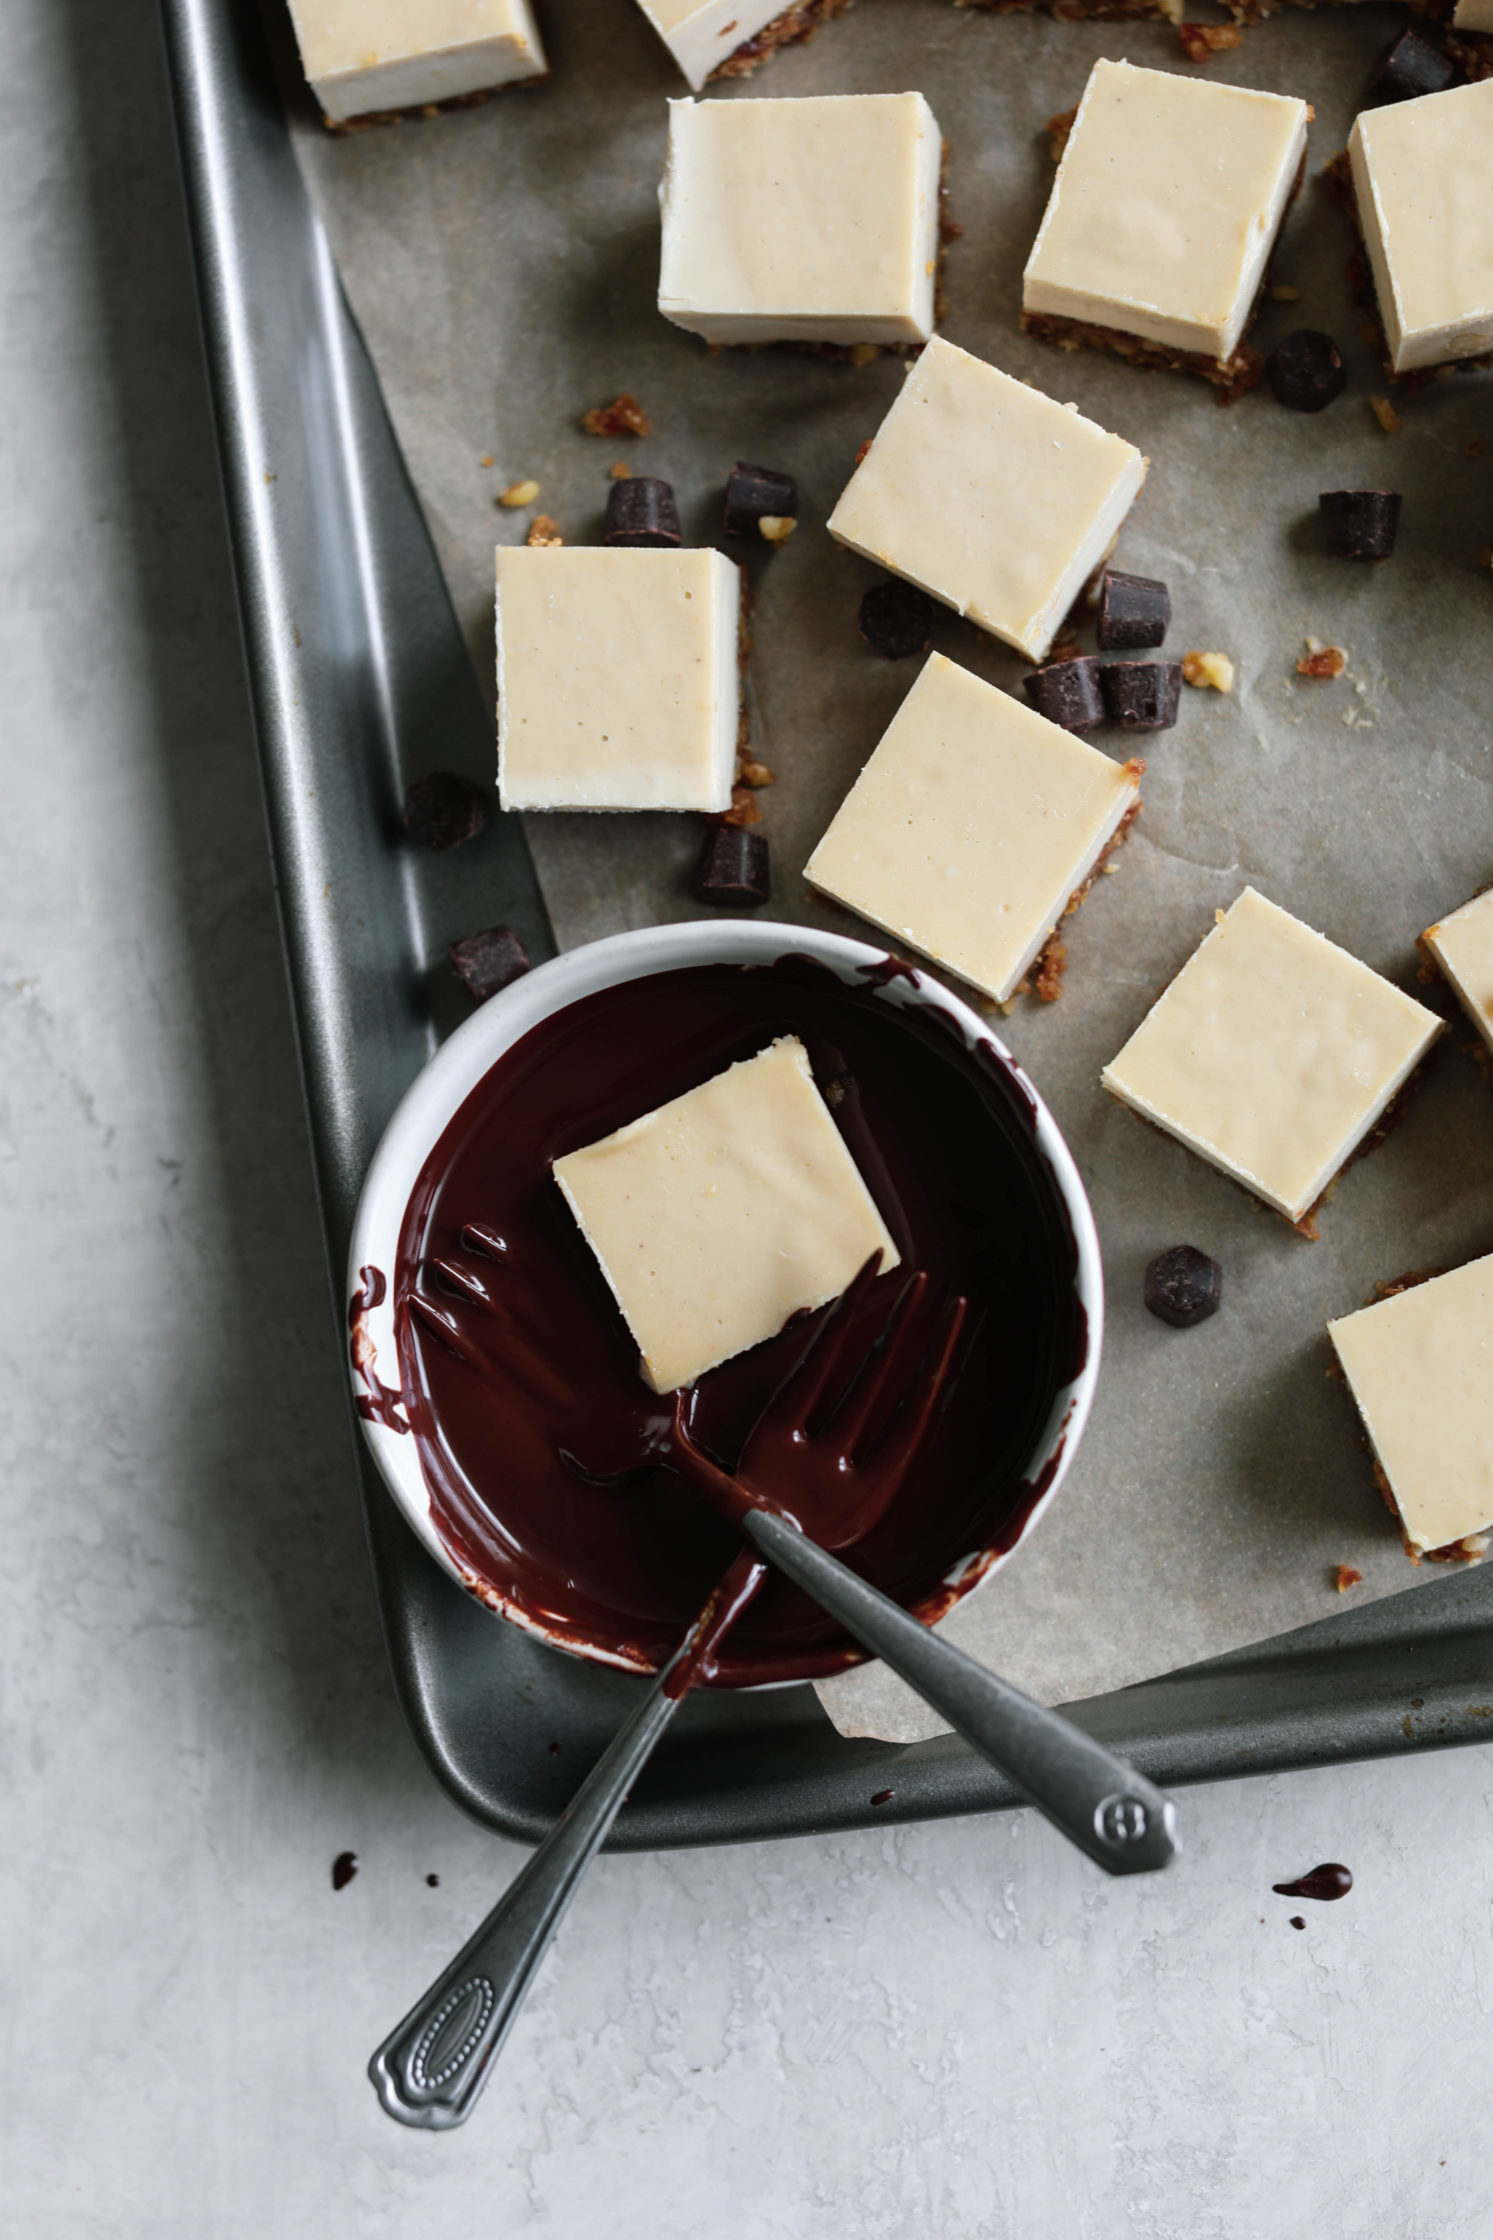
Now we take all of those delicious cheesecake squares and dip them in dark chocolate.
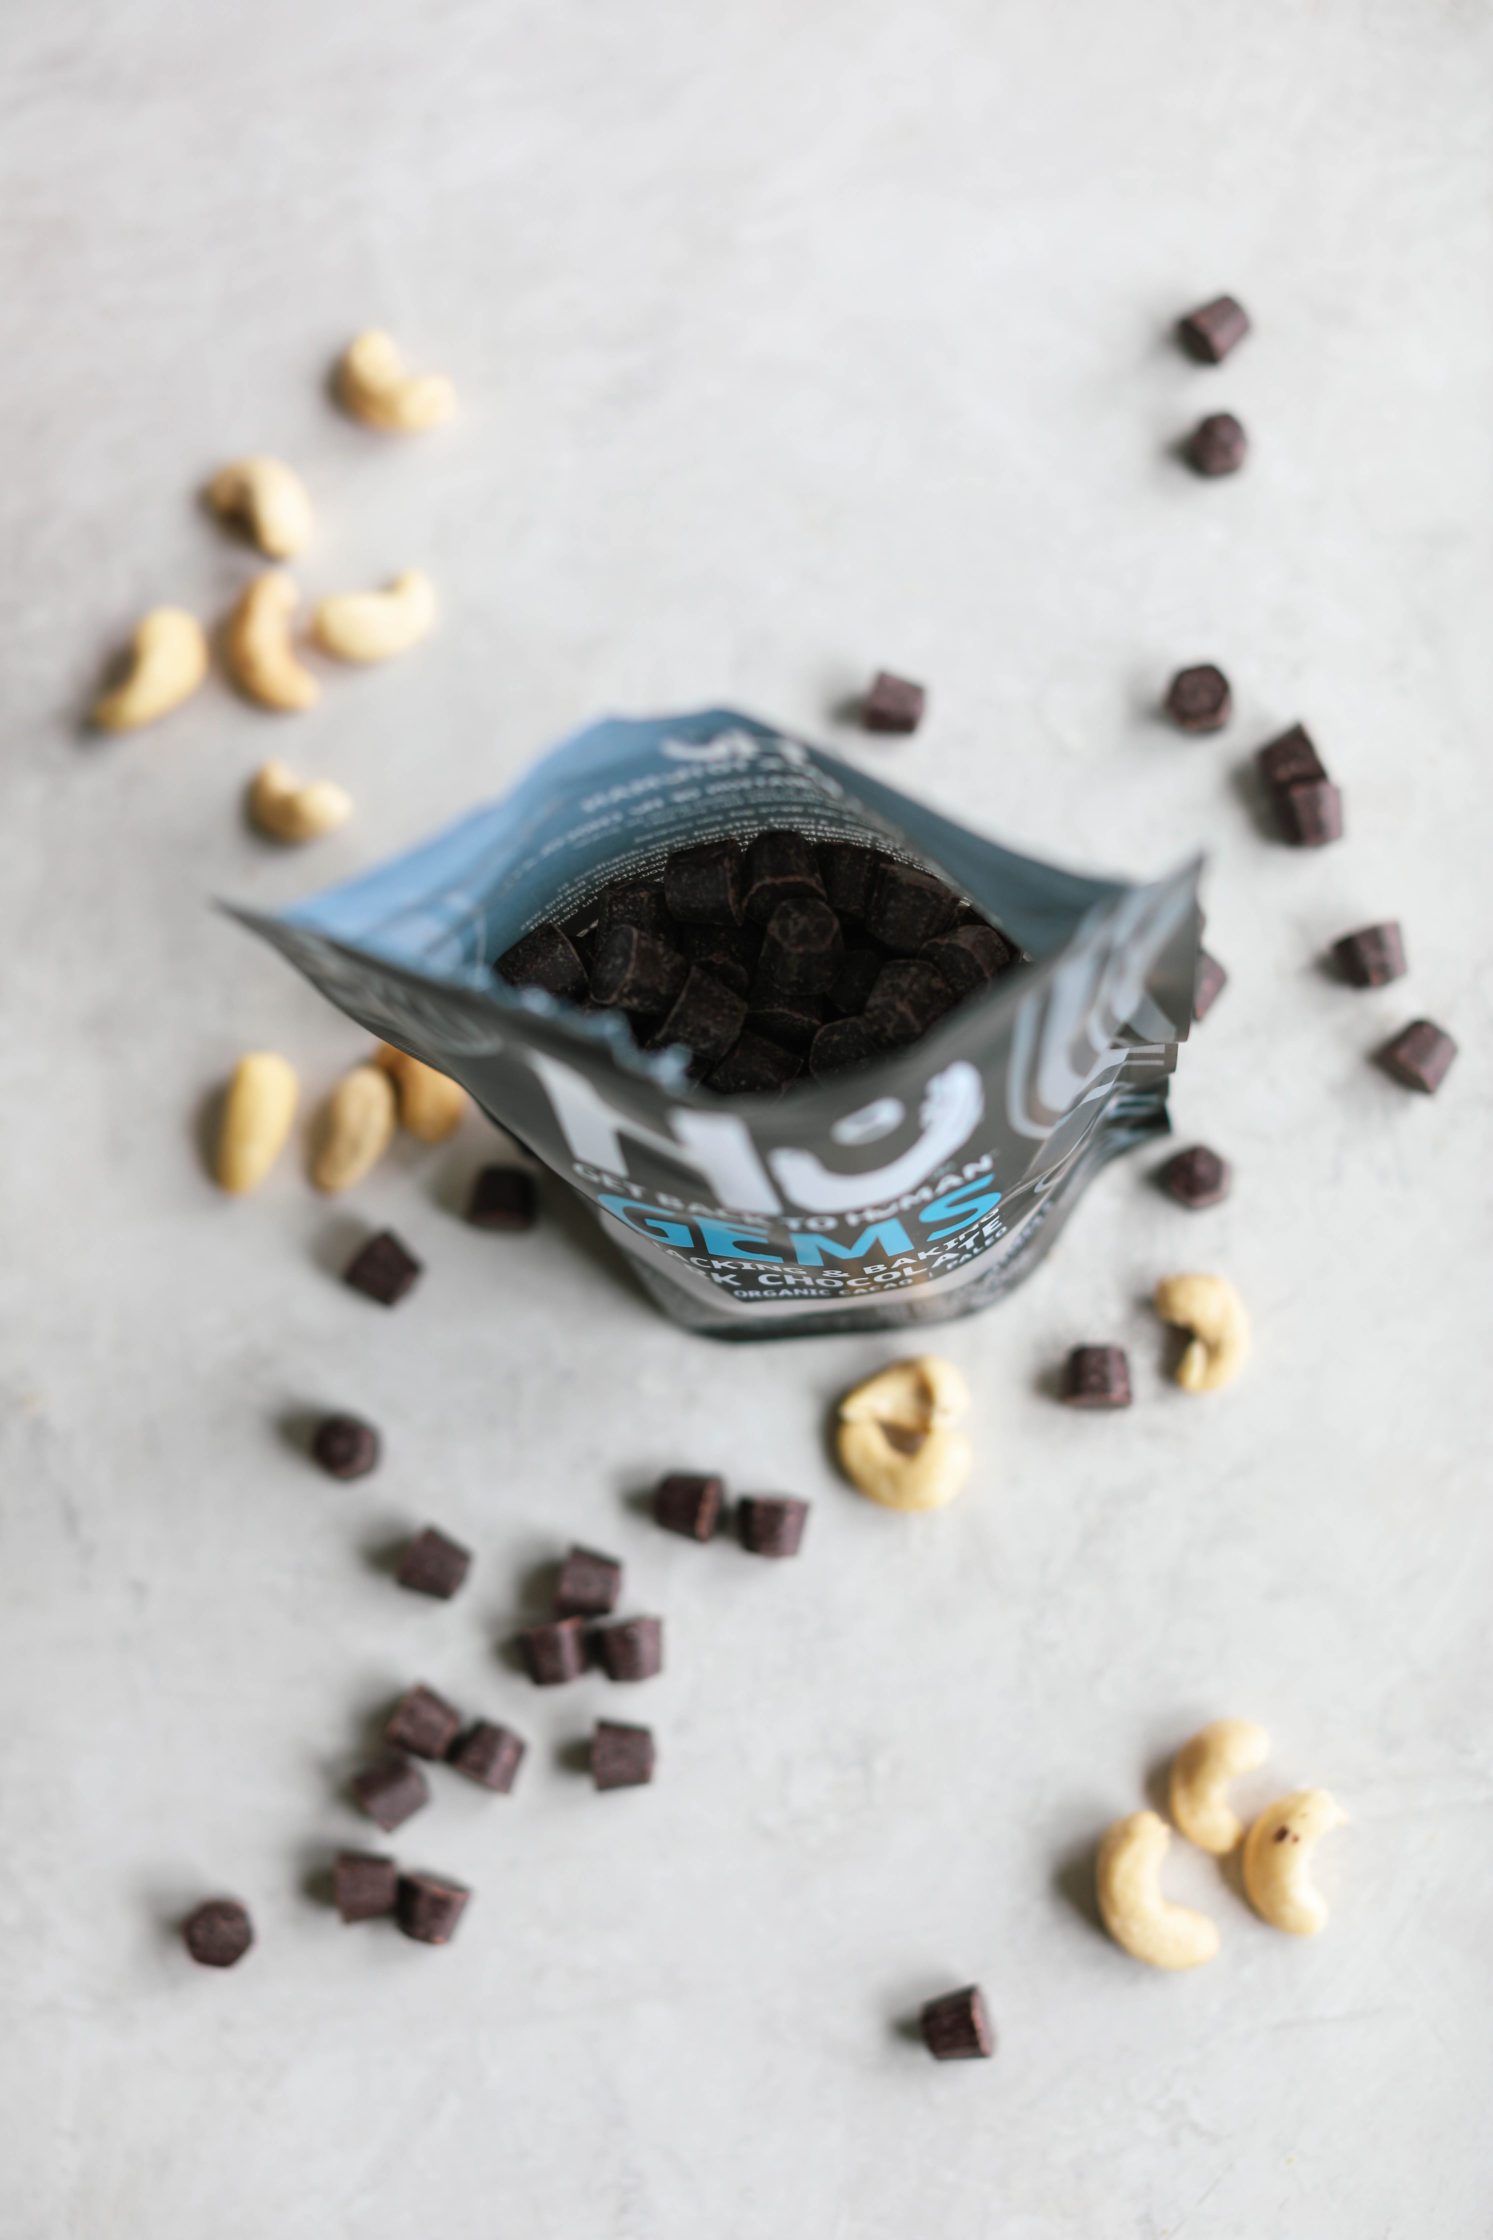
I used Hu Kitchen Gems as the melty chocolate finish to these cheesecake bites.
Heat a bag of Gems on the stovetop, then transfer to a small heat-safe bowl for easy cheesecake submersion.
You might not use the entire bag melted, but I found it helpful to have extra chocolate in the bowl so the cheesecake doesn’t touch the sides.
Work quickly, dunking the cheesecakes in chocolate with two forks until fully coated, allowing any excess chocolate to run off before placing back on the sheet.
If your chocolate starts to cool before the cheesecake is done, reheat in the microwave in 10 second intervals until it’s runny again.
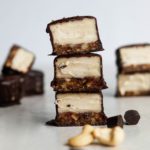
Once all of the squares are dunked, quickly transfer them into the freezer to harden.
The chocolate should be firm after an hour or so.
You can test by removing one from the freezer and pressing firmly with your fingers.
If the filling budges even the slightest, it needs more time in the big chill.
Alternatively, you can, of course, just do a simple taste test.
When they’re frozen solid, you can remove the Chocolate Dipped Cheesecake Bites from the parchment paper and transfer them to an airtight freezer container for storage.
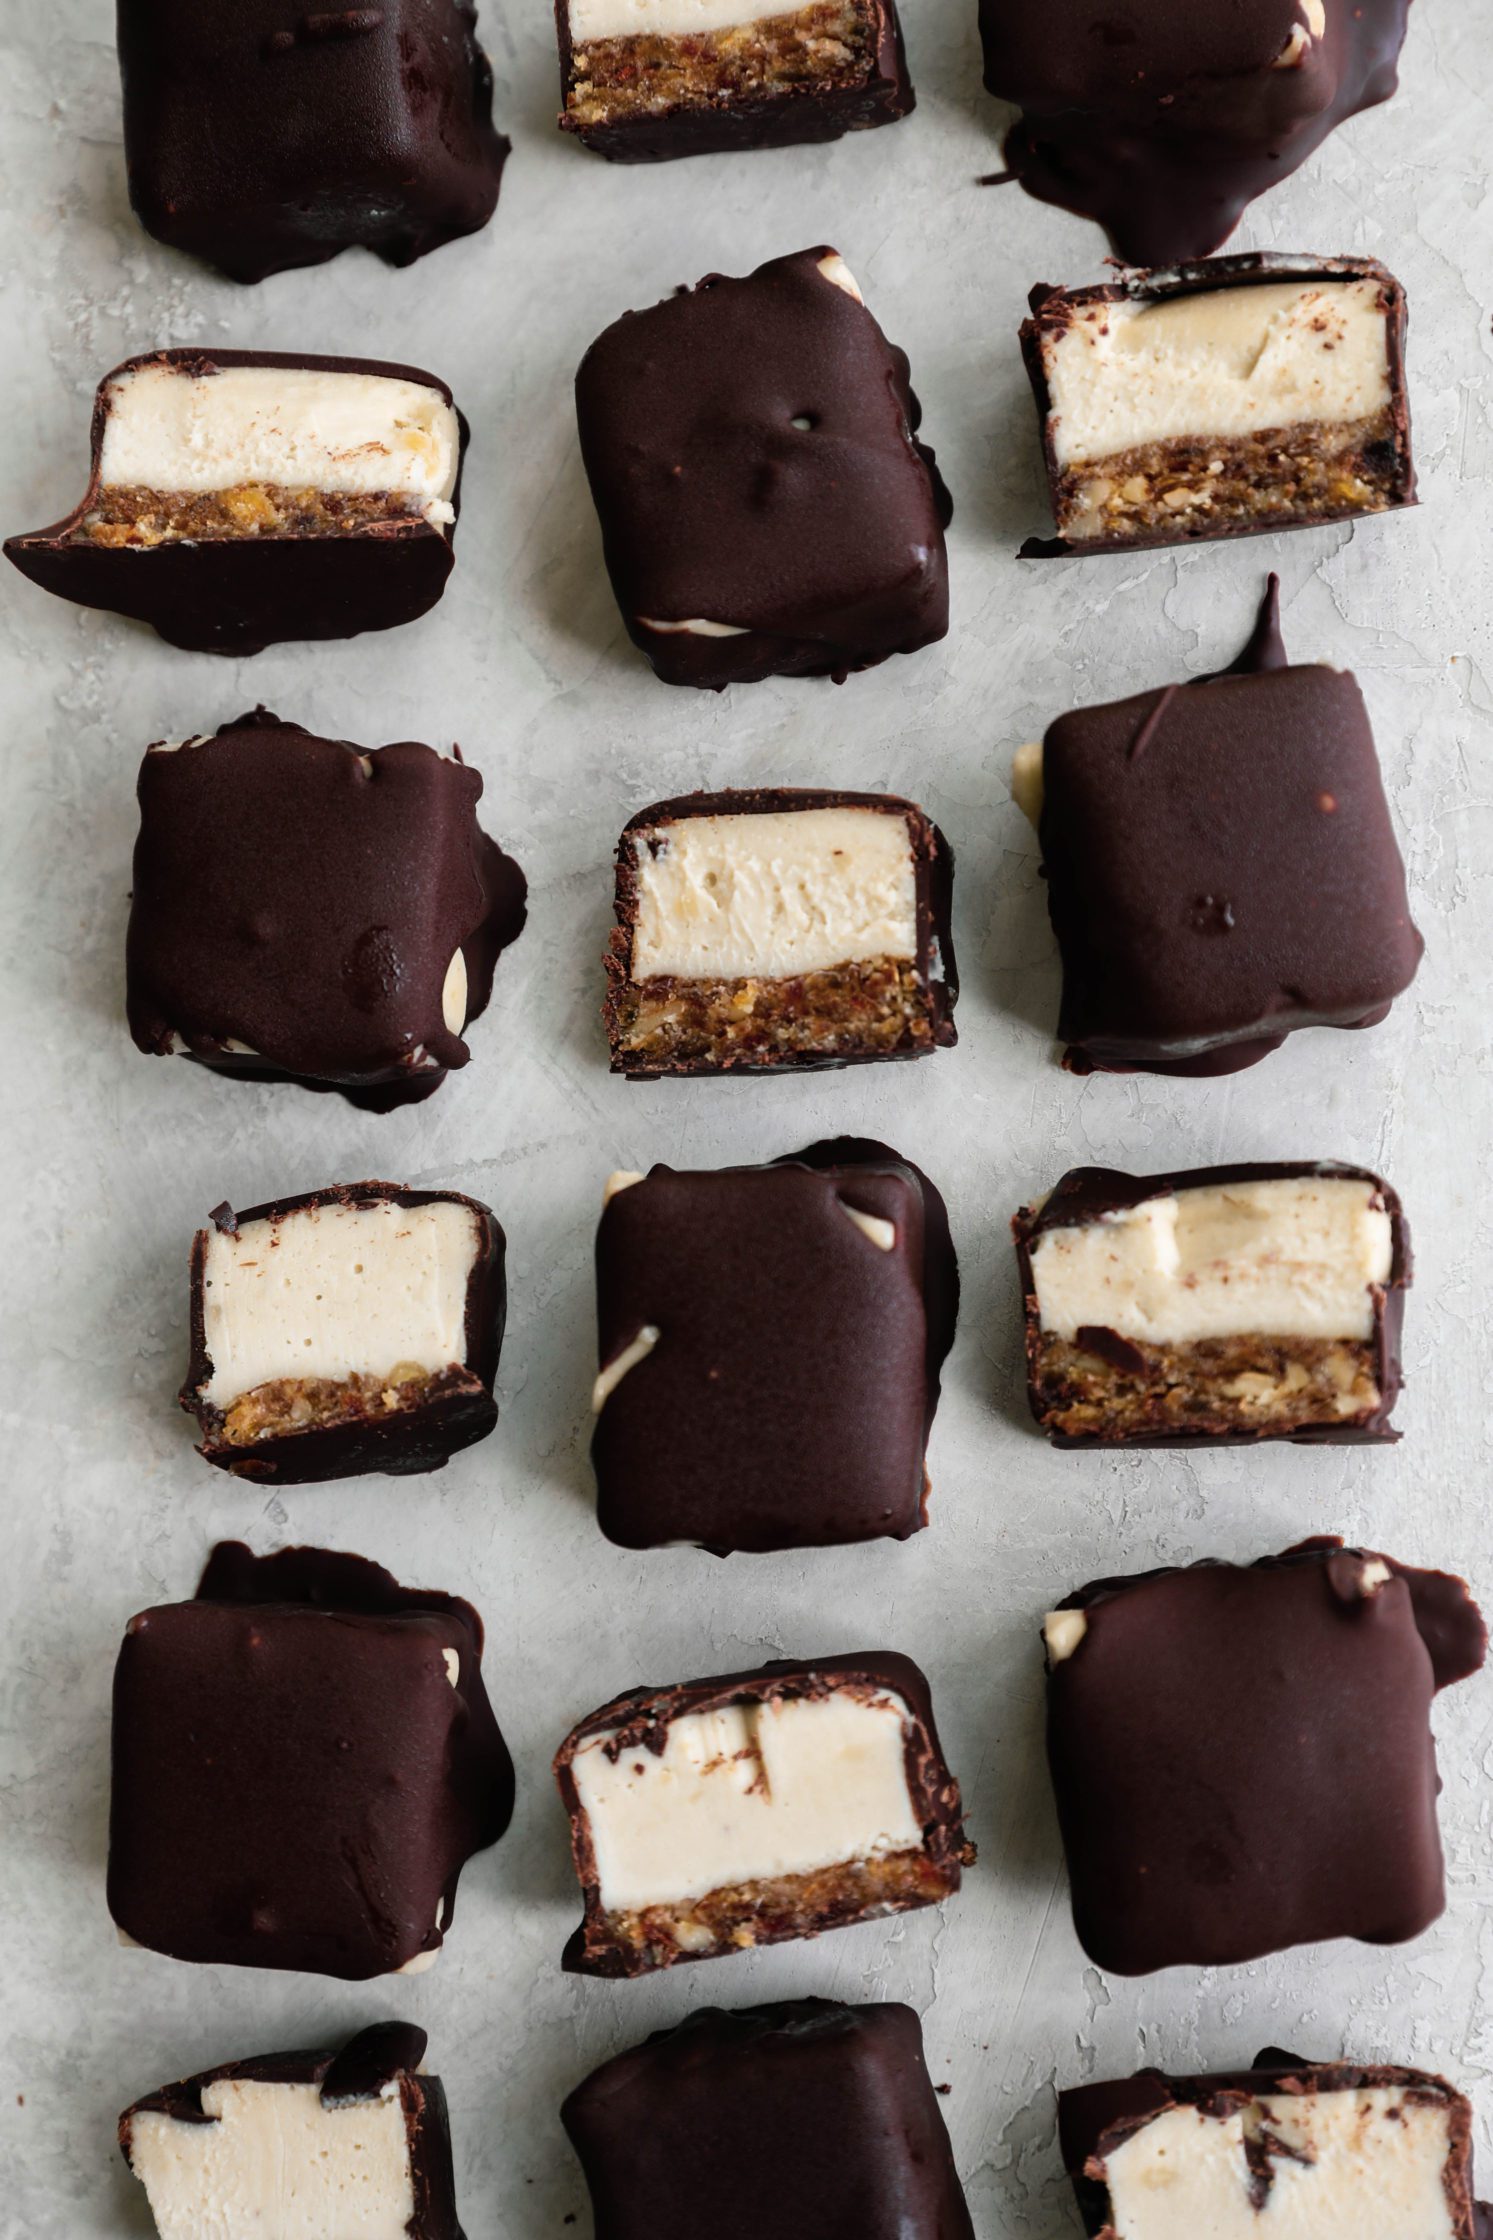
These Chocolate Dipped Cheesecake Bites are the dessert that you *always* need stocked in your freezer.
Cheesecake (even the vegan kind) can be rich, so I love that these are pre-portioned into little bit-sized squares.
I love to eat my squares straight from the freezer for a firmer chilled treat.
If you prefer softer cheesecake, let the squares sit on the kitchen counter for 5-10 minutes before serving.
Make sure you place whatever you’re not enjoying right back in the freezer!
They will get melty and soupy if left at room temperature for extended periods of time.
Enjoy!

If you try these Chocolate Dipped Cashew Cheesecake Bites, let me know! I’d love to hear what you think of them.
Be sure to leave me a comment, rating, and review so I can use your feedback to create more yums.
Give me a shout on Instagram and use #floraandvino to show me your creations.
Check out my Pinterest page to pin more recipes like this one to make later.
Want more easy no-bake cheesecake? Check out my Double Chocolate Cheesecake Bars and Pink Peanut Butter Cheesecake Cups.
Love this post and want more? Go to my homepage and subscribe to get updates delivered right to your inbox!
XO Lauren
Chocolate Dipped Cashew Cheesecake Bites
- Total Time: 1 hour
- Yield: 36 cheesecake bites
Description
Easy raw vegan cheesecake bites with soaked cashews and coconut milk coated in dark chocolate. The perfect naturally sweetened pre-portioned treat.
Ingredients
CRUST
- 1 cup packed pitted dates
- 1 cup raw walnuts
FILLING
- 1 1/2 cups raw cashews, quick-soaked in boiling water for ~30 mins
- 1 large lemon, squeezed (~2 TBSP lemon juice)
- 2/3 cup full-fat coconut milk
- 1/3 cup cashew butter
- 1/2 cup maple syrup
CHOCOLATE COATING
- 1 bag Hu Kitchen Dark Chocolate Gems
Instructions
- Quick soak your cashews by soaking them in a heat-safe bowl with boiling water. Soak for 30 minutes, then drain, rinse, and set aside.
- Add the pitted dates and walnuts to a high-speed blender and pulse until you have a sticky ball, scraping down the sides as needed to recombine. You want the dough to be well-combined but some visible clumps of date and walnut are OK.
- Line a 8×8 or 9×9 pan with parchment paper and press date/walnut mixture into the bottom to form an even base layer. Wet your hands with water before pressing to prevent the dough from sticking to your hands.
- Transfer pan to the freezer to chill the base while you mix up the cheesecake filling.
- Combine all filling ingredients in a blender and blend on high until smooth and creamy.
- Remove pan from the freezer and pour the cheesecake filling on top of the crust and smooth to form and even layer. Tap the pan several times on the counter to remove any air bubbles. Transfer pan back to the freezer and freeze overnight, or at least 8 hours, until cheesecake is solid.
- When the cheesecake is frozen, remove from the freezer and transfer to a cutting board. Slice the cheesecake into 36 even squares and transfer back to the freezer while you prepare the chocolate coating.
- Add the Gems to a large saucepan over medium low heat. Heat until fully melted, stirring occasionally. Transfer melted chocolate to a medium heat-safe bowl.
- Line a baking sheet with parchment paper and set next to the melted chocolate. Remove cheesecake squares from the freezer and using two forks quickly dunk into the melted chocolate. Drain any excess chocolate from the squares before placing onto the baking sheet. Repeat until all cheesecake squares are dunked.
- Transfer baking sheet to the freezer and freeze for at least one hour or until chocolate and cheesecake are firm. Enjoy immediately. For firmer cheesecake bites, enjoy straight from the freezer. For softer cheesecake bites, allow to sit at room temperature for 5-10 minutes before serving.
- Store leftover cheesecake bites in a freezer-safe air-tight container for up to 3 months.
Notes
- Prep Time: 1 hour
- Cook Time: 0 mins
- Category: Dessert
- Method: Stovetop, Freezer, Blender
- Cuisine: Vegan, Gluten-Free, Grain-Free, Oil-Free, Refined Sugar-Free, Paleo
This post is brought to you by Hu Kitchen, but all words and eats are my own. Thanks for supporting the sponsors that keep me hungry!

Made these yesterday and they are delicious!!
So glad you enjoyed!
“Quick soak your cashews by soaking them in a heat-safe bowl with boiling water. Soak for 30 minutes” – can someone explain me (my English is not very good) is water boiling for the whole period of 30 minutes? Do I wait for water to boil, then set aside and soak cashews and leave them for 30min? Thanks 🙂
Hi! That’s OK! Boil the water then pour it over the cashews in a heat safe bowl. Let them soak for 30 minutes. Let me know if you have any more questions and how it goes!
XOXO Lauren
I made them! I worried a bit that it won’t be enough, but man, we ate them for almost a week 😀 They are pretty “heavy”, I couldn’t eat more than two in a row, even though I wanted to 🙂
YAY, so glad you enjoyed! They are rich! They do their own portion control, haha!
I will have to try these…sounds yummy!!
Hi Eloisa!
Let me know when you do!
XOXO Lauren
Just made these yesterday! turned out fabulous! i subbed half hazelnuts for the crust, and added a little honey and vanilla to the chocolate mix! We cant stop eating them! very simple recipe and yields a lot!
Hi Halle!
I’m so glad you enjoyed them! I love the hazelnut crust addition and the honey and vanilla! YUM. Thanks for taking the time to comment and review 🙂
XOXO Lauren